User Guide
Table of Contents
- Introduction
- About This Document
2.1 Glossary
2.2 Formatting
2.3 Command Format - Getting Started
3.1 Setting Up
3.2 Using Trackr
3.3 Switching Views - Features
4.1 General Features
— 4.1.1 View help:help
— 4.1.2 Clear Trackr:clear
— 4.1.3 Exit Trackr:exit
4.2 Navigation Features
— 4.2.1 List all modules in Trackr:listMod
— 4.2.2 View all tutorial groups in a module:viewtTG
— 4.2.3 List all tutorial groups in the current module:listTG
— 4.2.4 View all students in a tutorial group:viewStudent
— 4.2.5 List all students in a tutorial group:listStudent
— 4.2.6 Return to previous view:prevView
4.3 Module Features
— 4.3.1 Add a module:addMod
— 4.3.2 Delete a module:deleteMod
— 4.3.3 Edit a module:editMod
— 4.3.4 Find a module:findMod
4.4 Tutorial Group Features
— 4.4.1 Add a tutorial group:addTG
— 4.4.2 Delete a tutorial group:deleteTG
— 4.4.3 Edit a tutorial group:editTG
— 4.4.4 Find a tutorial group:findTG
4.5 Student Features
— 4.5.1 Add a student:addStudent
— 4.5.2 Delete a student:deleteStudent
— 4.5.3 Edit a student:editStudent
— 4.5.4 Find a student:findStudent
4.6 Attendance Features
— 4.6.1 Add attendance:addAttendance
— 4.6.2 Delete attendance:deleteAttendance
— 4.6.3 View all attendance of a student:viewAttendance
— 4.6.4 Show students who fall below an attendance score:attendanceBelow
— 4.6.5 Edit a student’s participation:editParticipation
— 4.6.6 Show students who fall below a participation score:participationBelow - FAQ
- Command Summary
6.1 General Commands
6.2 Navigation Commands
6.3 Module Commands
6.4 Tutorial Group Commands
6.5 Student Commands
6.6 Attendance Commands
1. Introduction
(written by: Ethan Rozario)
Trackr is an application for teaching assistants (TAs) who prefer to use a desktop application for managing their student records. It is uses a Command Line Interface (CLI), while still retaining the benefits of a Graphical User Interface (GUI). If you are a TA with a fast typing speed, Trackr is the app for you! You can start by familiarising yourself with the information regarding how this document is designed in Section 2, “About this document”.
2. About this document
(written by: Ethan Rozario)
Welcome to the Trackr User Guide! In this document you will be able to learn the features that Trackr can provide to make your TA experience less troublesome, by making data management, attendance tracking, and participation tracking a breeze. This section will provide information regarding the use of this document, namely how to navigate through this document, what the technical terms mean and how to interpret the formatting used.
2.1 Glossary
The table below explains certain terms used in the document to describe different parts or aspects of the application.
| Term | Meaning |
|---|---|
| Graphical User Interface (GUI) | An interface through which users interact with electronic devices via visual indicator representations. |
| Command Line Interface (CLI) | An interface that processes commands to a computer program in the form of lines of text. |
| Command | An instruction typed by you, the user for Trackr to perform. |
| Field | A segment of a command that requires information to be filled into. |
| Parameter | The information filled by you, the user, into the field of a command. |
| Prefix | A short word that is typed right before you, the user, writes the parameter into the command. It always starts with a slash (/) and typically is an abbreviation of the name of the field. |
| Module | The specific course being taught in a University. |
| Tutorial Group | The specific class being taught under a given module. |
| Student | An individual who is enrolled in a given module. |
2.2 Formatting
This document is written in a manner where formatting is applied to text in order to convey different meanings. The table below will explain what these formatting uses are, what they look like, and what they mean in the context of the document.
| Formatting | Meaning |
|---|---|
code |
Words in ‘code’ format refer to commands (or fields in commands) that can be typed into the command line. |
| Italics | Words in italics refer to example parameters, which is what you, the user could type as the parameter that needs to be provided. |
| Underline | Words that are in blue and underlined when hovered over refer to hyperlinks. Hyperlinks are clickable, and bring you either to different parts of this document or to external websites, for the convenience of navigating quickly to different parts of the document or the web. This example on the left will bring you to this section (2.2 Formatting). |
| Bold | The name of the application Trackr is written in bold to refer to what the application does or how it responds to user input. |
2.3 Command Format
Commands you provide in the command line follow specific rules. These are the rules you have to follow when typing commands for Trackr to read:
- Words in UPPER_CASE are the parameters to be supplied by the user.
e.g. inaddMod m/MODULE_CODE, MODULE_CODE is a parameter which can be used asaddMod m/CS3243. - Items in square brackets are optional.
e.gn/NAME [t/TAG]can be used asn/John Doe t/friendor asn/John Doe. - Items with … after them can be used multiple times including zero times.
e.g.[t/TAG]…can be used as (i.e. 0 times),t/friend,t/friend t/familyetc. - Parameters can be in any order.
e.g. if the command specifiesn/NAME p/PHONE_NUMBER,p/PHONE_NUMBER n/NAMEis also acceptable. - Multiple instances of the same parameter will still be accepted, however, Trackr will only regard the last instance as the intended user input, except for tags.
e.g.addMod m/CS3243 m/CS2100will only add the module CS2100 to Trackr.editStudent 1 n/Johnny n/Jameswill edit the student’s name to be James.addStudent n/John Doe p/98765432 e/johnd@example.com id/A1234567X t/CS2103T t/CS2100will still add both tags to the newly added student John Doe.
3. Getting Started
(written by: Sean Tay)
3.1 Setting Up
Get started by installing Trackr with the following steps:
- Ensure you have Java 11 or above installed. The latest version of Java can be found here.
- Download the latest version of Trackr here. Look for the file trackr.jar.
- Copy the file to a folder you wish to use as your home folder for Trackr
- Double-click trackr.jar to start the app. The GUI (Figure 3.1) should appear in a few seconds.
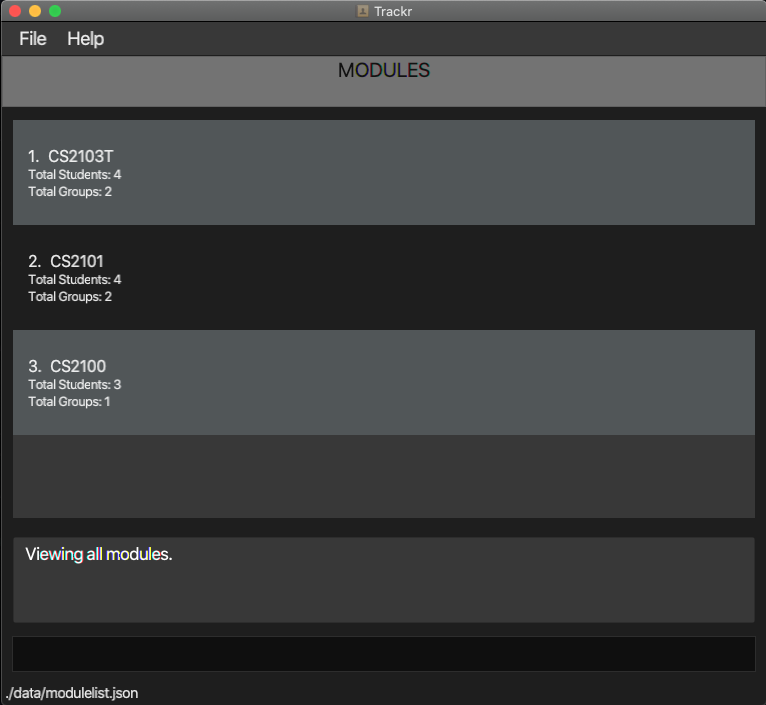
Figure 3.1a Trackr GUI
3.2 Using Trackr
Trackr boasts many useful features to make using the app seamless and smooth. These include commands to add or delete modules, tutorial groups, or students you are teaching. To use a feature, simply type the command into the command box (see Figure 3.2) and press Enter to execute it. Further explanations of all the commands are listed in Section 4, “Features”.
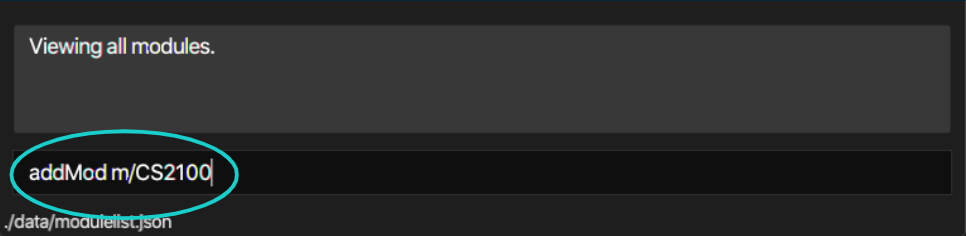
Figure 3.2a Command example
3.3 Switching Views
Trackr allows you to switch the current view from Module View (Figure 3.3.1) to Tutorial Group View (Figure 3.3.2)
to Student View (Figure 3.3.3) depending on your current need. This is done using the commands listMod, viewTG, and
viewStudent. You may wish to navigate back from Student View to Tutorial Group View or from Tutorial Group View to
Module View. This is achieved using prevView. The correct syntax for these commands are shown in
Section 4, “Features”. The top of the app shows the view you are currently in.
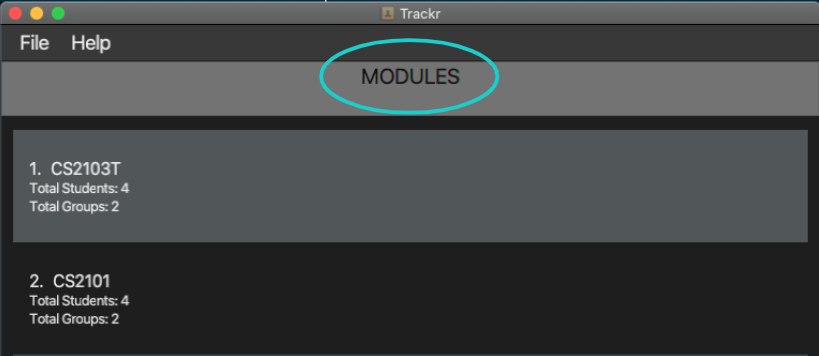
Figure 3.3a Module View
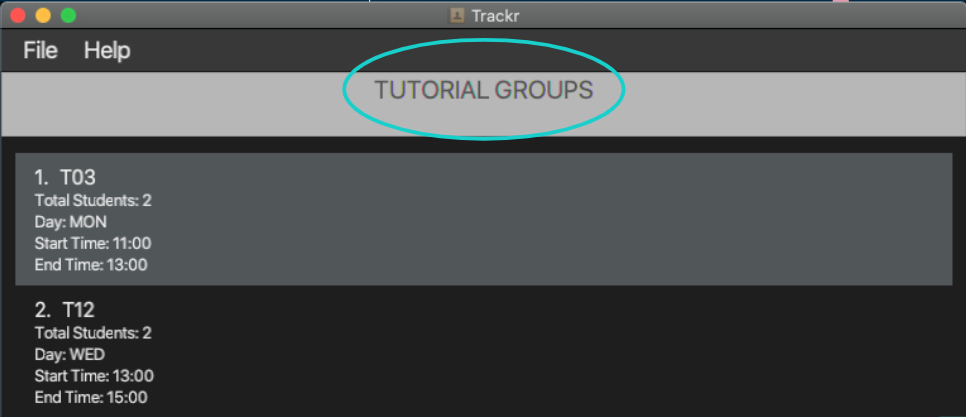
Figure 3.3b Tutorial Group View
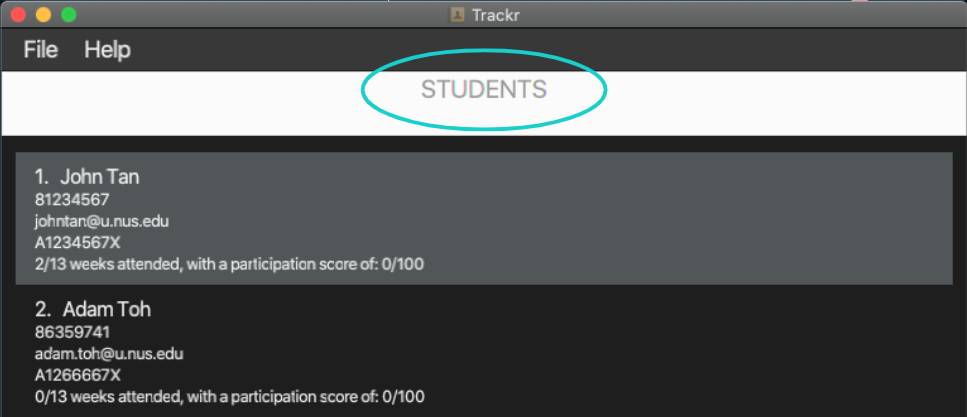
Figure 3.3c Student view
4. Features
4.1 General Features
(written by: Sean Tay)
4.1.1 View help: help
Shows a message explaining how to access the user guide.
Format: help
Note
- You can perform this command in ANY view.
Example: help
Expected Outcome:
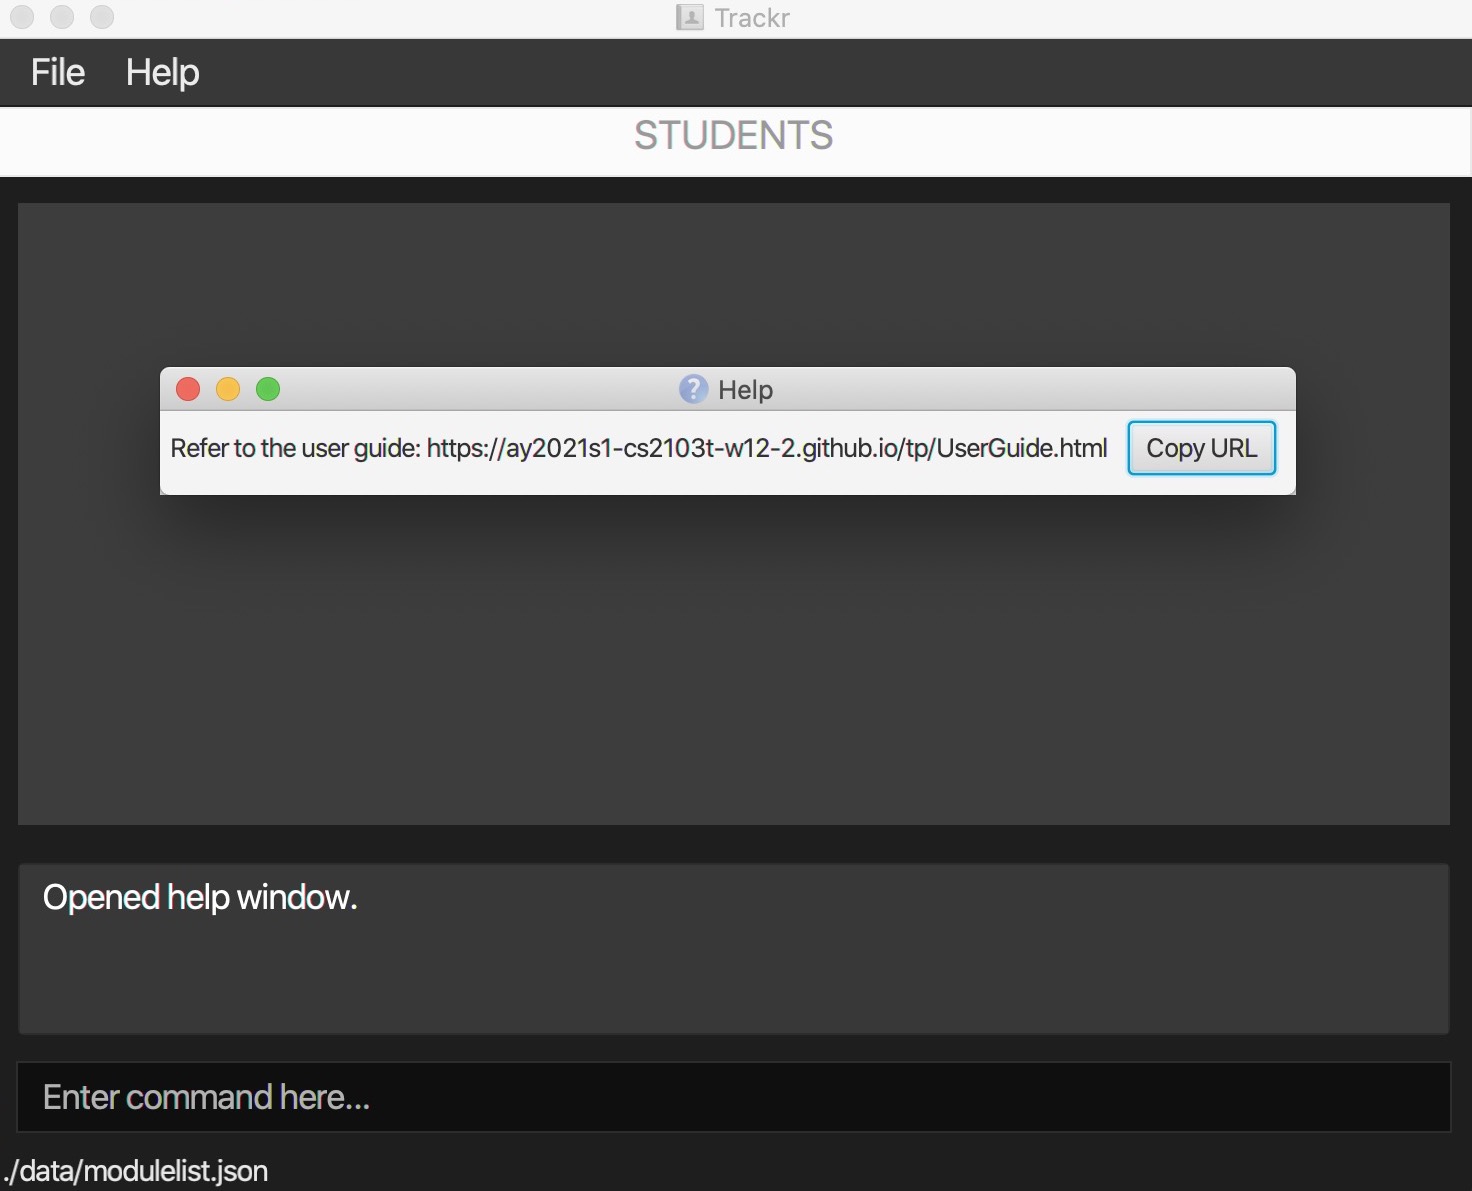
Figure 4.1.1a Expected outcome of performing the help command
4.1.2 Clear Trackr: clear
Clears all data inside Trackr.
Format: clear
Note
- You can perform this command in ANY view.
- Trackr will erase all data.
- Method is irreversible.
- View will change to Module view.
Example: clear
Expected Outcome:
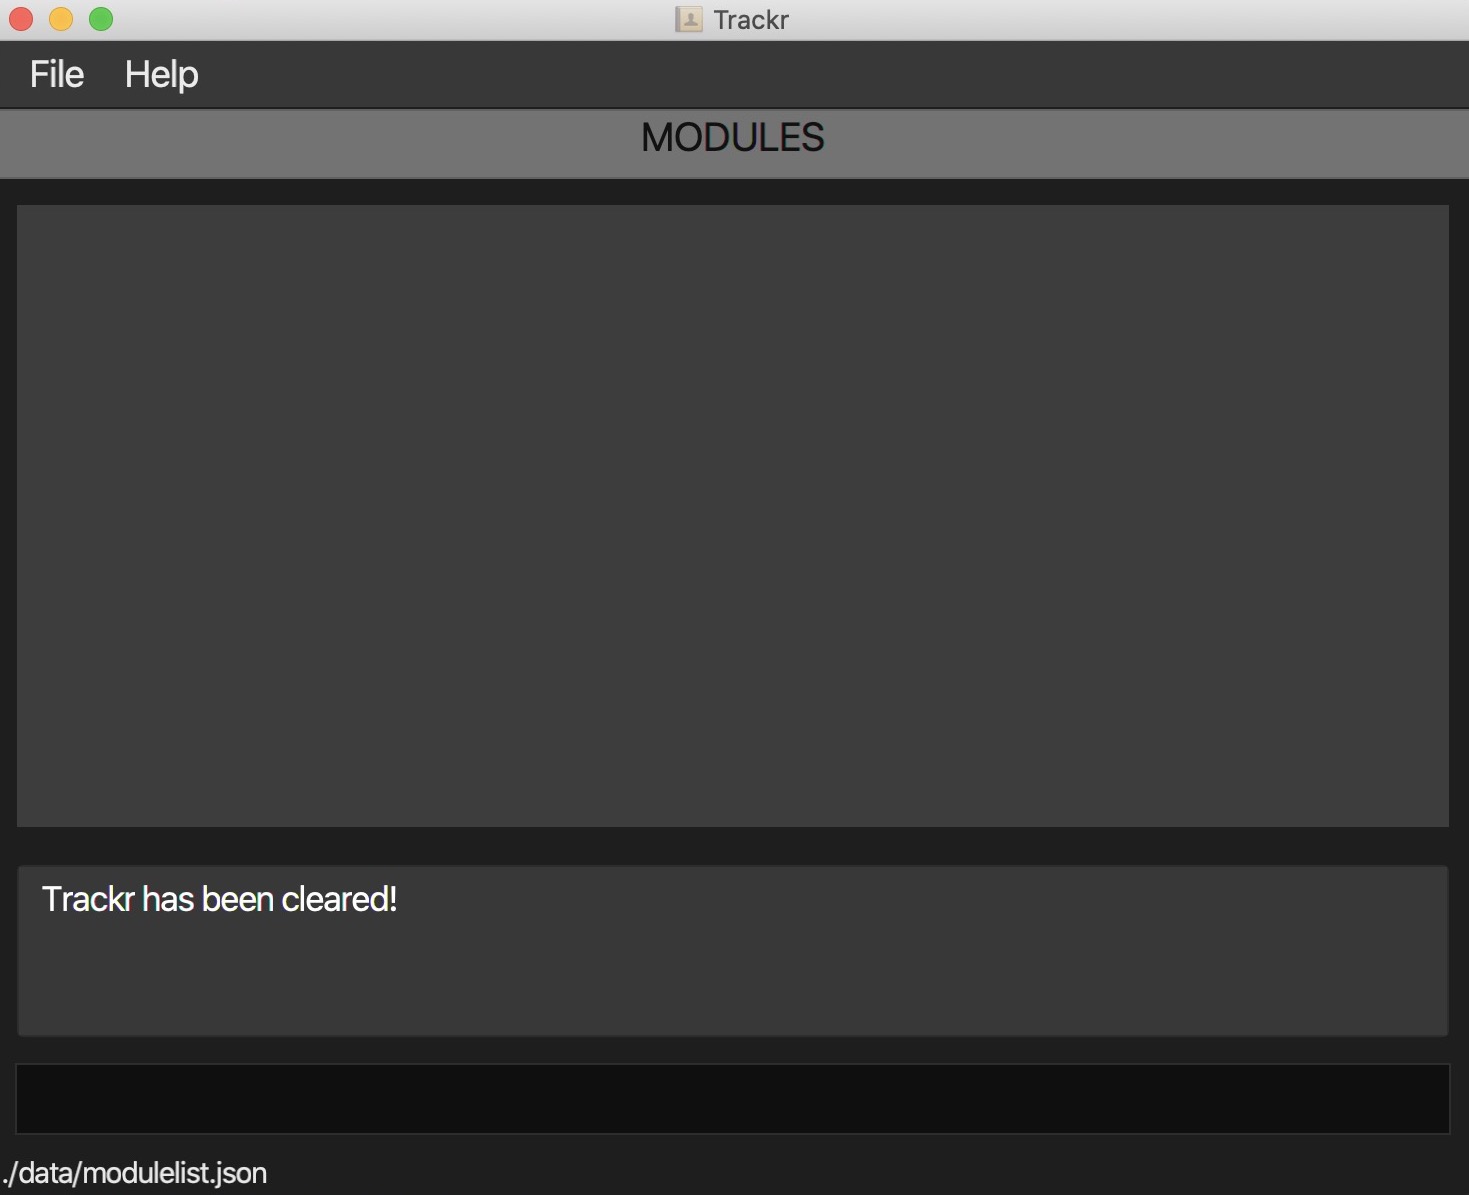
Figure 4.1.2a Expected outcome of performing the clear command
4.1.3 Exit Trackr: exit
Exits Trackr and automatically saves the data.
Format: exit
Note
- You can perform this command in ANY view.
- Trackr will close by itself.
Example: exit
4.2 Navigation Features
(written by: Sean Tay)
4.2.1 List all modules in Trackr: listMod
Lists all the modules in the Module view.
Format: listMod
Note: You can perform this command in ANY view.
Example:
- Lists all modules in Trackr.
listMod
Expected Outcome:

Figure 4.2.1a Expected outcome of performing the listMod command
4.2.2 View all tutorial groups in a module: viewTG
Shows the tutorial group list of a target module.
Format: viewTG INDEX
Note:
- You should perform this command in the Module view.
INDEXis the target module’s index in the currently displayed module List.
Example:
- Changes the view to Tutorial Group view and shows the tutorial group list of module at index 1.
viewTG 1
Expected Outcome:
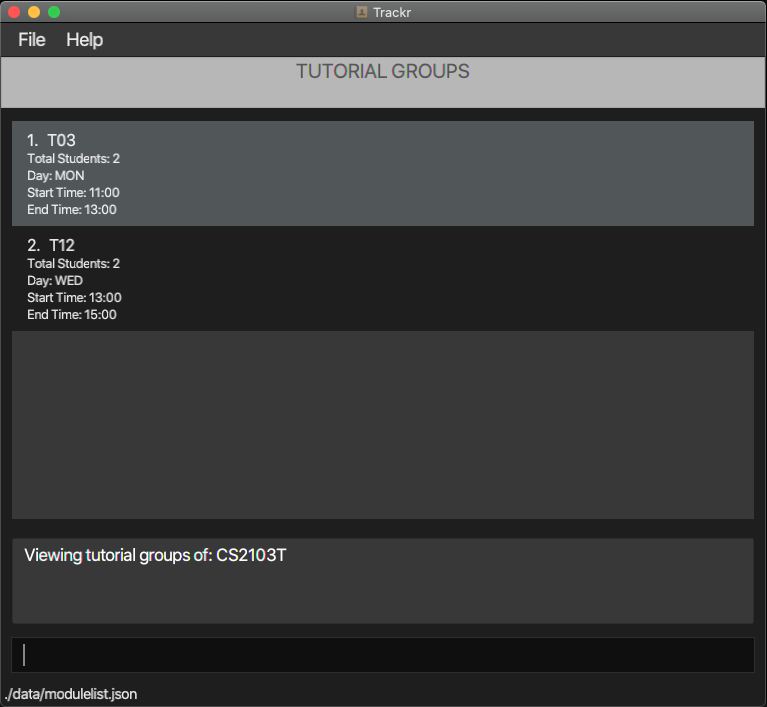
Figure 4.2.2a Expected outcome of performing the viewTG command
4.2.3 List all tutorial groups in the current module: listTG
Lists all tutorial groups in the Tutorial Group view.
Format: listTG
Note:
- You should perform this command in the Tutorial Group view.
Example:
- Lists all tutorial groups in the Tutorial Group view.
listTG
Expected Outcome:
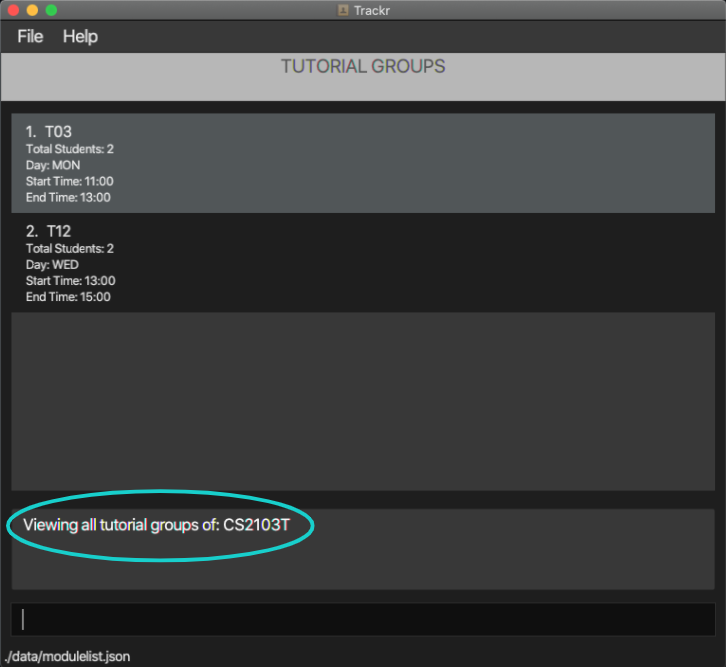
Figure 4.2.3a Expected outcome of performing the listTG command
4.2.4 View all students in a tutorial group: viewStudent
Shows the student list of a target tutorial group.
Format: viewStudent INDEX
Note: You should perform this command in the TUTORIAL GROUP view.
INDEXrefers to the index number shown in the Tutorial Group view.INDEXmust be a positive integer starting from 1.
Example:
- Changes the view to Student view and shows the student list of tutorial group at index 1.
viewStudent 1
Expected Outcome:
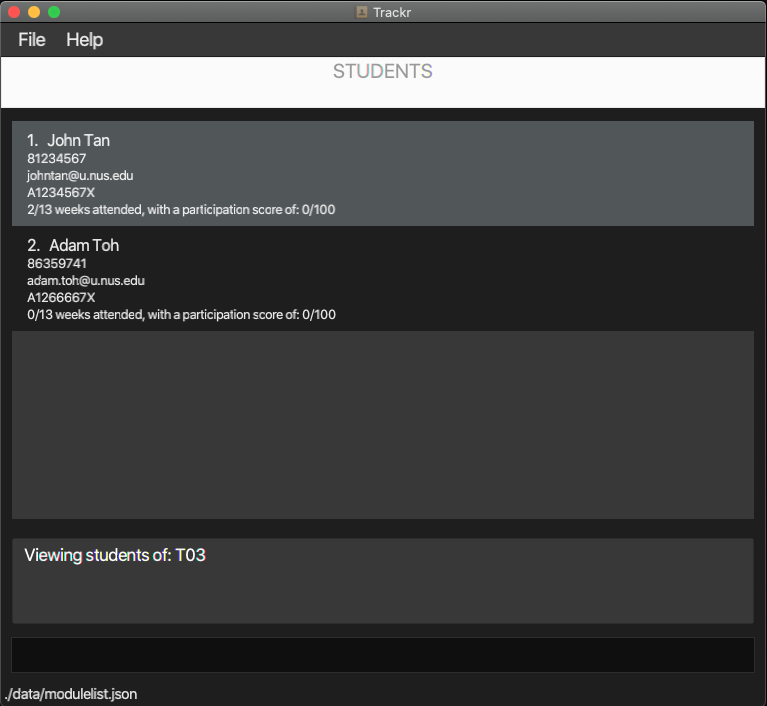
Figure 4.2.4a Expected outcome of performing the viewStudent command
4.2.5 List all students in a tutorial group: listStudent
Lists all students in the Student view.
Format: listStudent
Note:
- You should perform this command in the Student view.
Example:
- Lists all students in the Student view.
listStudent
Expected Outcome:
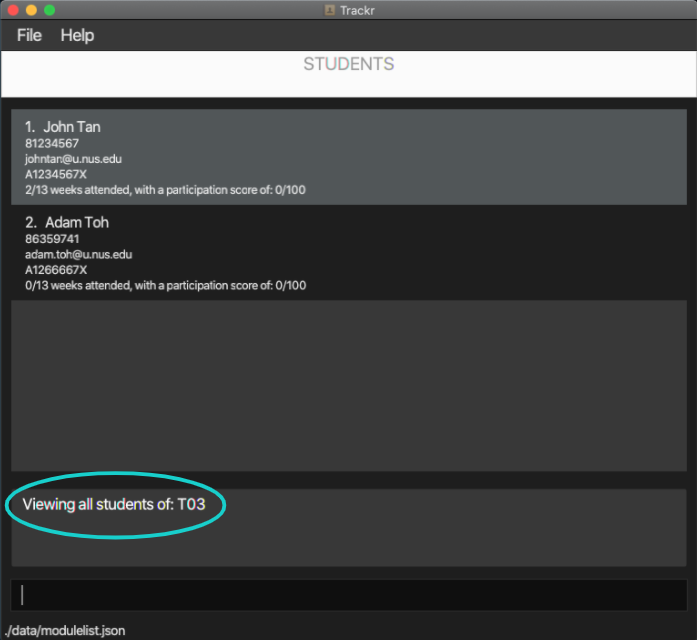
Figure 4.2.5a Expected outcome of performing the listStudent command
4.2.6 Return to previous view: prevView
Returns to the previous view.
Format: prevView
Note:
- You can perform this command in ANY view but MODULE is the last View.
Example: prevView
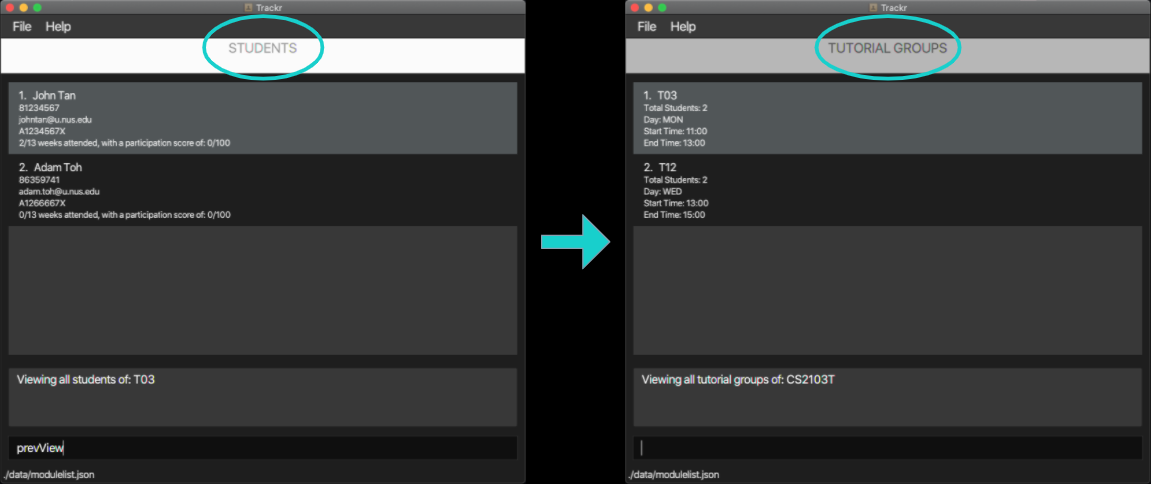
Figure 4.2.6a Expected outcome of performing the prevView command
4.3 Module Features
(written by: Juan Davin Lie)
You should perform the following features while in the Module view.
4.3.1 Add a module: addMod
Adds a module to the module list.
Format: addMod m/MODULE_CODE
Note:
- Modules should not share the same
MODULE_CODE.- It is recommended to use the exact code of the module.
MODULE_CODEshould not be blank and only contain alphanumeric characters.
Example:
- Adds a module CS2100 to the module list.
addMod m/CS2100
Expected Outcome:
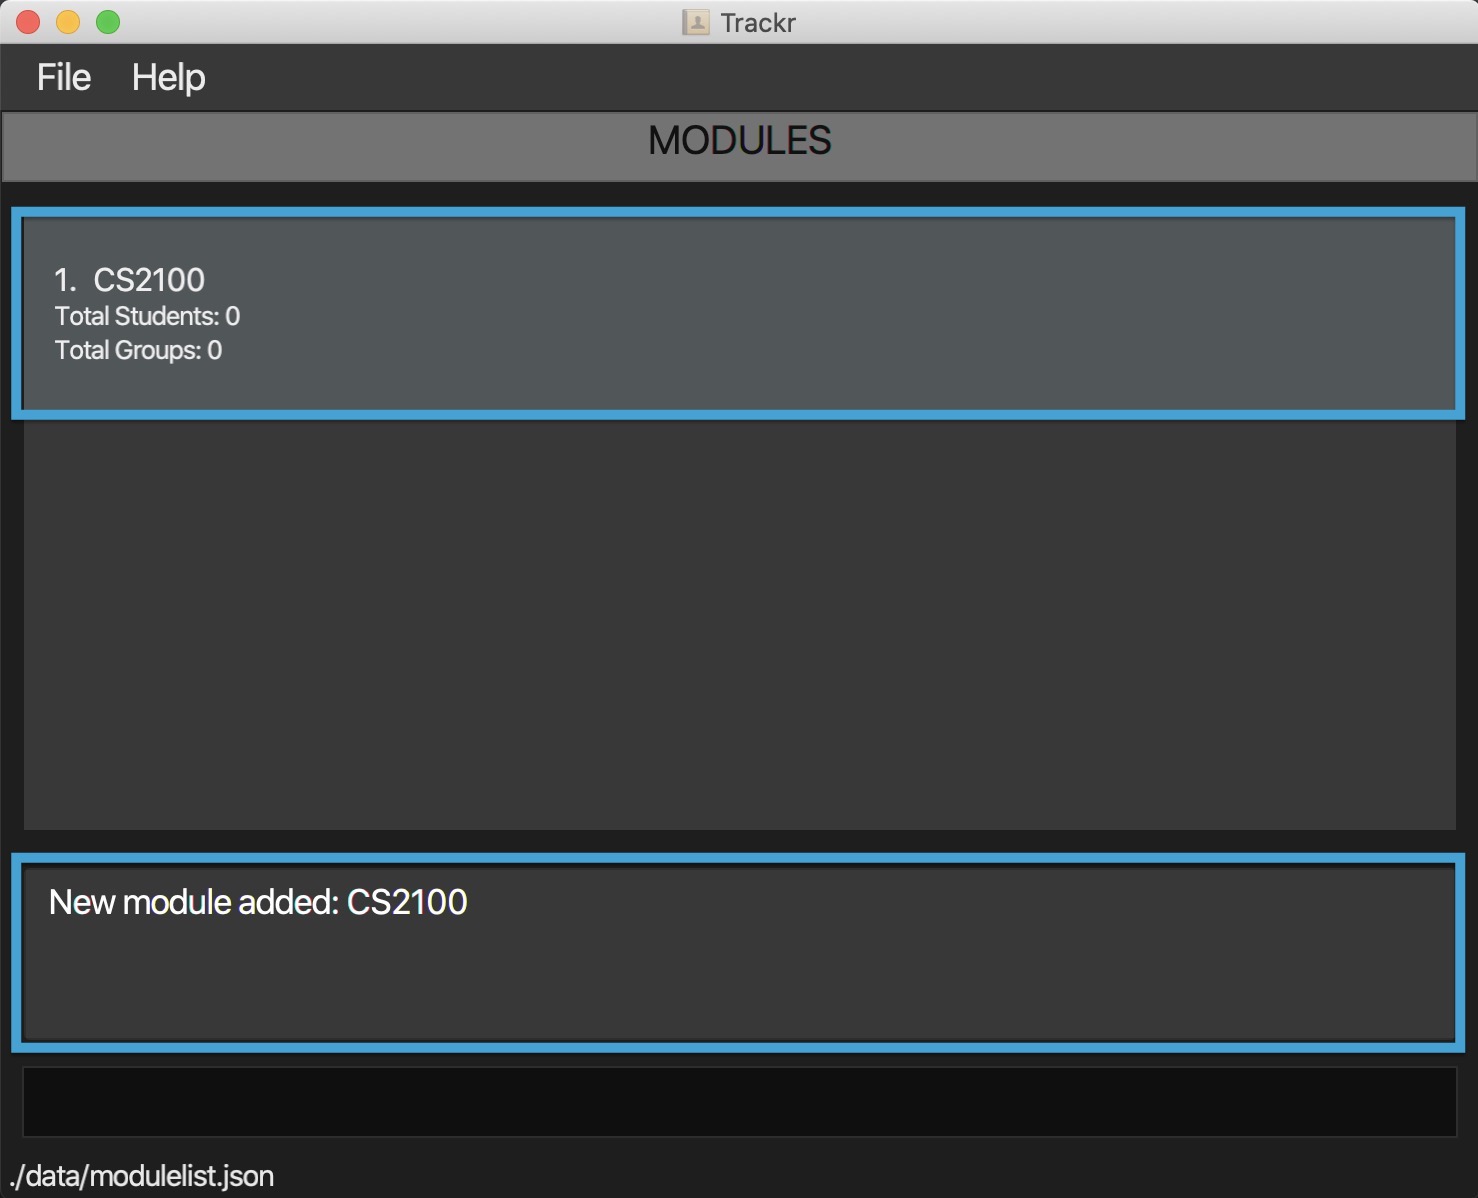
Figure 4.3.1a Expected outcome of performing the addMod command
4.3.2 Delete a module: deleteMod
Deletes a module based on the given INDEX
Format: deleteMod INDEX
Note:
INDEXrefers to the index number shown in the Module view.INDEXmust be a positive integer starting from 1.- Deleting a module is irreversible.
Example:
- Deletes a module at index 1 in the module list.
deleteMod 1
Expected Outcome:
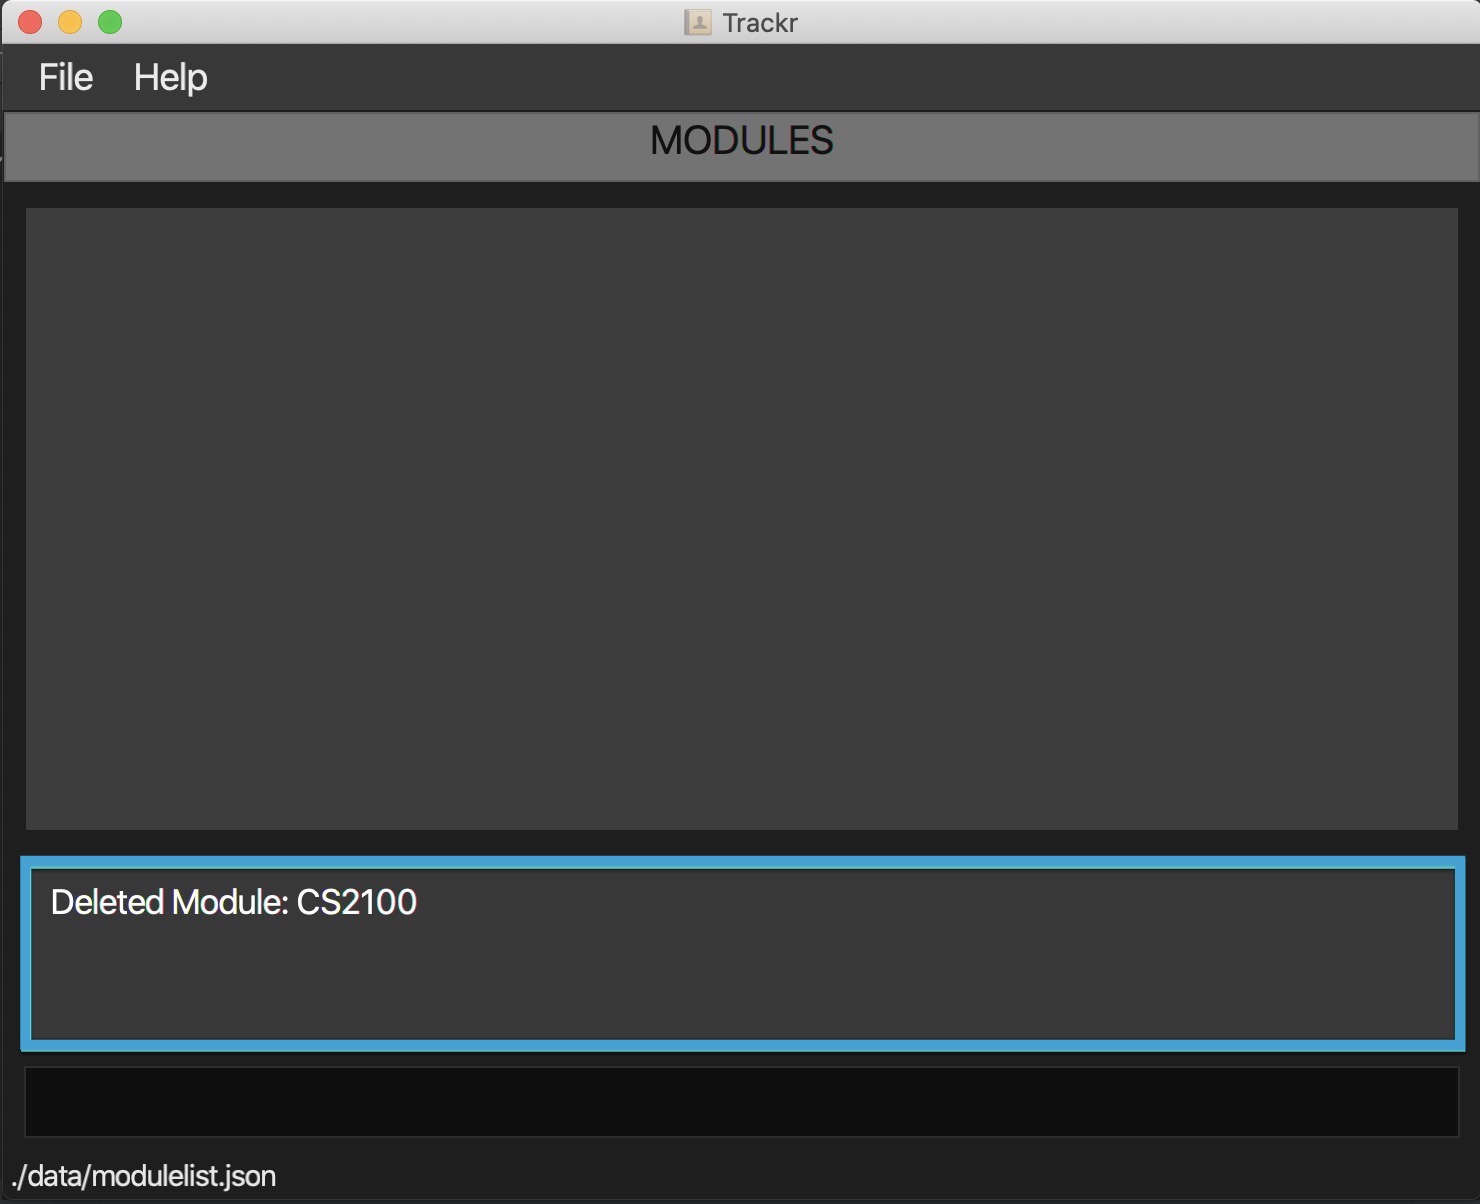
Figure 4.3.2a Expected outcome of performing the deleteMod command
4.3.3 Edit a module: editMod
Edits a module with the provided details.
Format: editMod INDEX m/MODULE_CODE
Note:
INDEXrefers to the index number shown in the Module view.INDEXmust be a positive integer starting from 1.- New
MODULE_CODEshould not already exist.
Example:
-
Edits the module code of the first module to be CS2020.
editMod 1 m/CS2020
Expected Outcome:
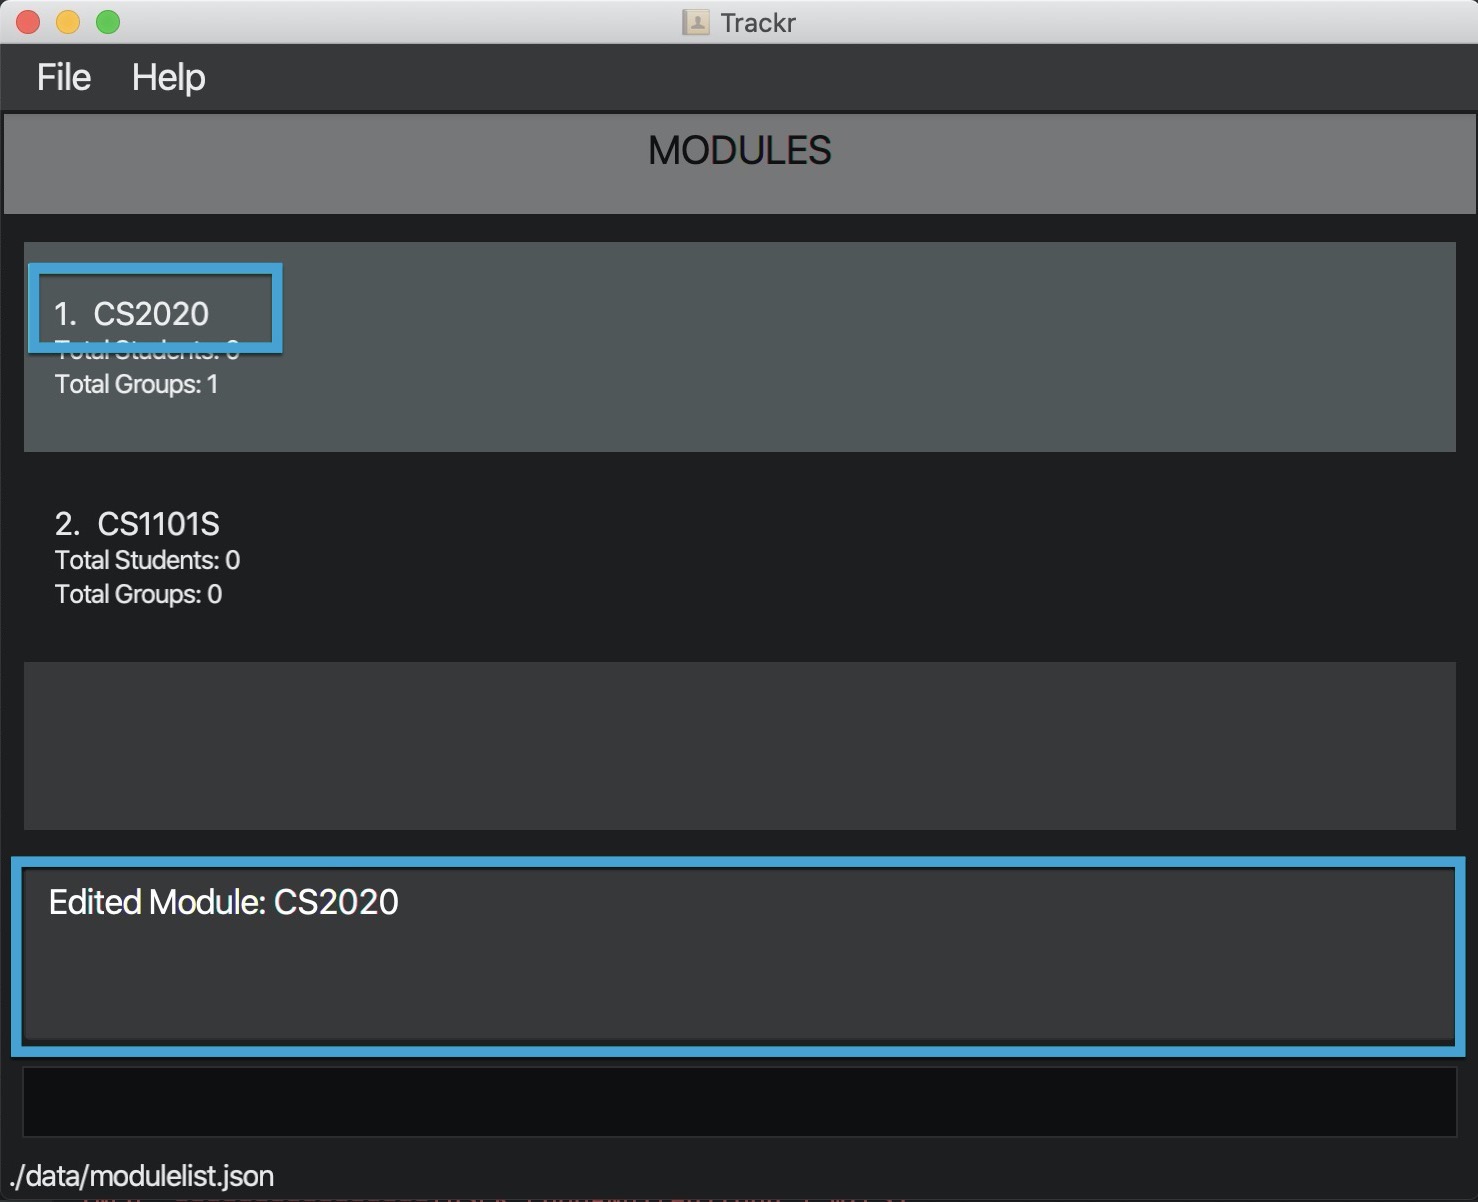
Figure 4.3.3a Expected outcome of performing the editMod command
4.3.4 Find a module: findMod
Finds and lists all modules in the current Module view whose module code contains any of the given keywords.
Format: findMod KEYWORD
Note:
KEYWORDshould not be blank.KEYWORDis not case-sensitive (e.g. cs2100 will match CS2100).- The search will look for matches, including partial match, in the module’s code (e.g. cs2 will match CS2100, however, cs23 will not match CS2100).
- If no module matching the keyword is found, the Module view will be empty.
Example:
-
Finds a module with
KEYWORDcs20.findMod cs20
Expected Outcome:
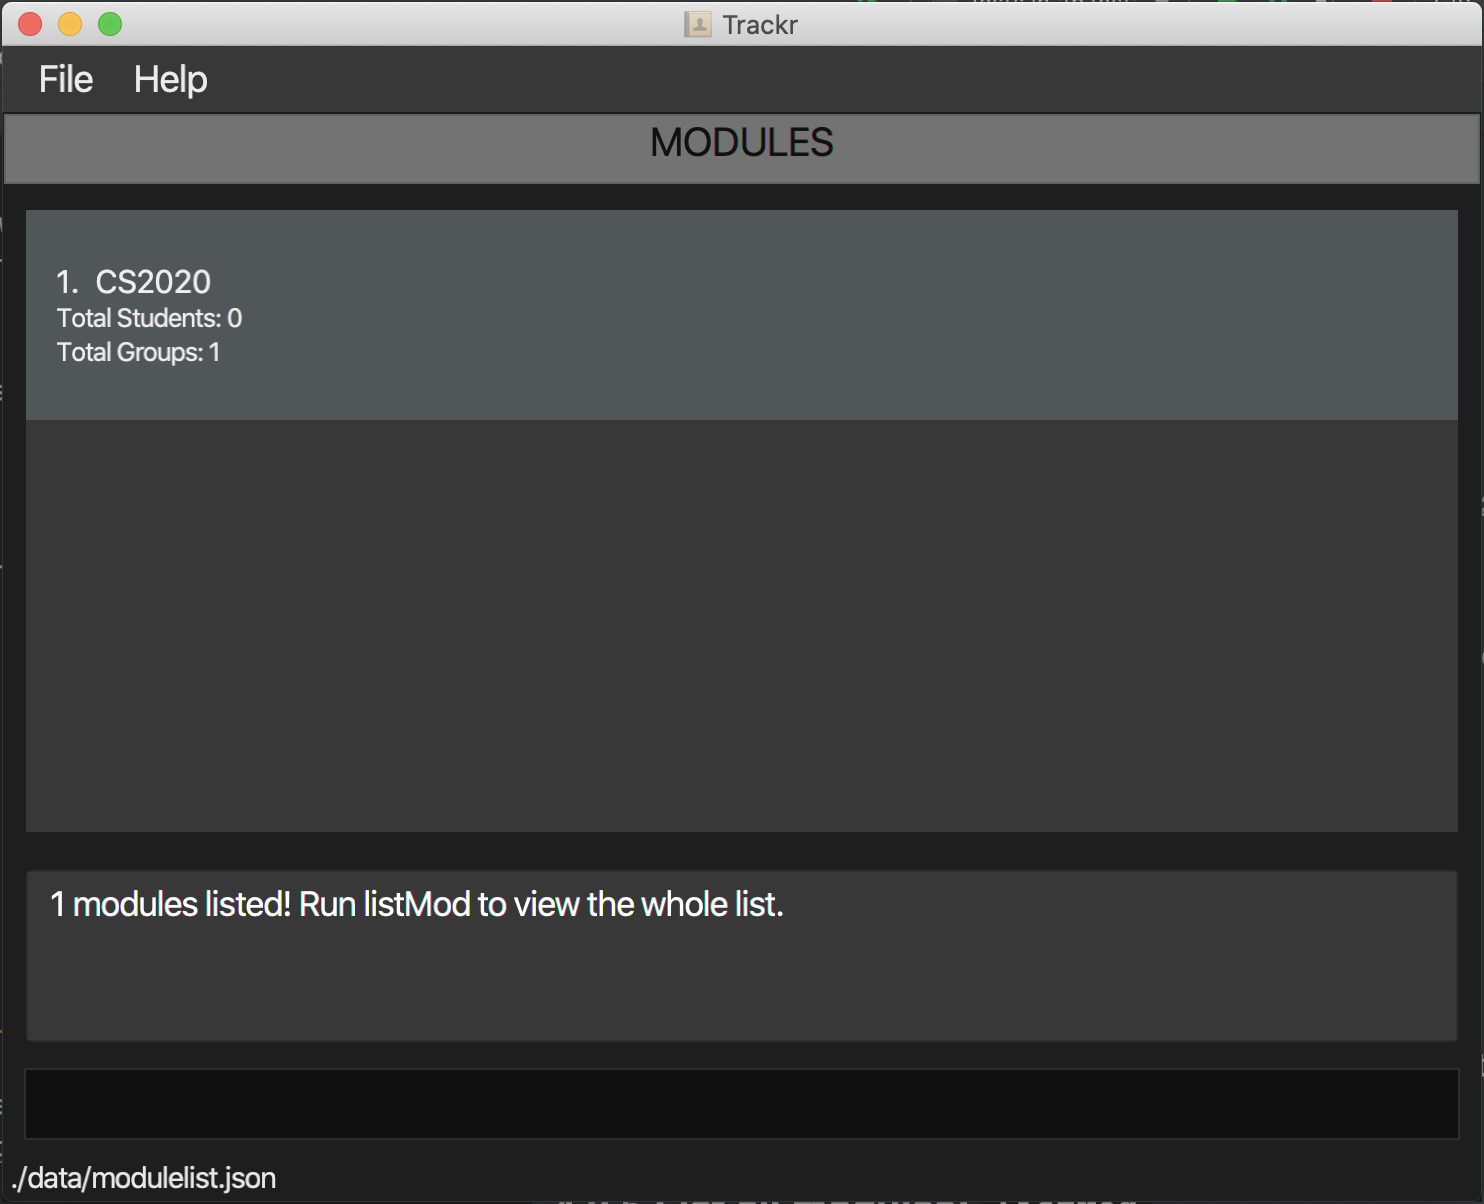
Figure 4.3.4a Expected outcome of performing the findMod command
4.4 Tutorial Group Features
(written by: Tan Eu Zin)
- You should perform the following features while in the Tutorial Group view.
- Refer to Section 4.2 - Navigation for help getting to the correct view
4.4.1 Add a tutorial group: addTG
Adds a tutorial group to the tutorial group list.
Format: addTG tg/TG_CODE day/DAY_OF_WEEK start/START_TIME end/END_TIME
Note:
- Tutorial groups should not share the same
TG_CODEwithin the same module.- It is recommended to use the exact code of the tutorial group.
TG_CODE,DAY_OF_WEEK,START_TIMEandEND_TIMEshould not be blank.TG_CODEshould only contain alphanumeric characters.DAY_OF_WEEKshould only be one of MON/TUE/WED/THU/FRI.START_TIMEandEND_TIMEshould be in the form of 24HR format HH:MM.
Example:
- Adds a tutorial group T03 that takes place every MON from 08:00 to 10:00 to the tutorial group list.
addTG tg/T03 day/MON start/11:00 end/13:00
Expected Outcome:
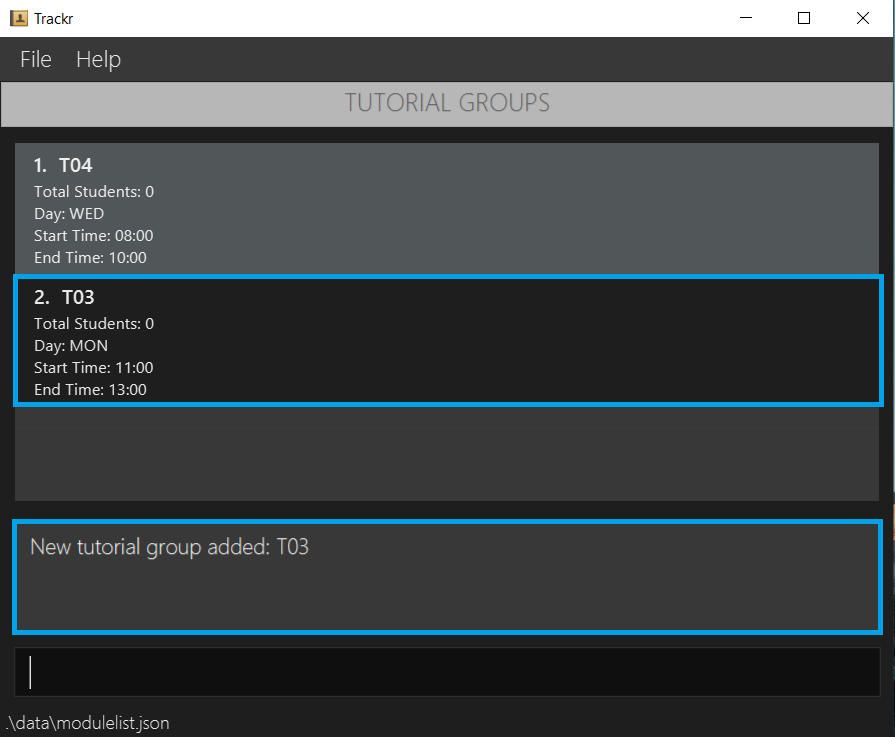
Figure 4.4.1a Expected outcome of performing the addTG command
4.4.2 Delete a tutorial group: deleteTG
Deletes a tutorial group based on the given INDEX
Format: deleteTG INDEX
Note:
INDEXrefers to the index number shown in the Tutorial Group view.INDEXmust be a positive integer starting from 1.- Deleting a tutorial group is irreversible.
Example:
- Deletes a tutorial group at index 1 in the tutorial group list.
deleteTG 1
Expected Outcome:
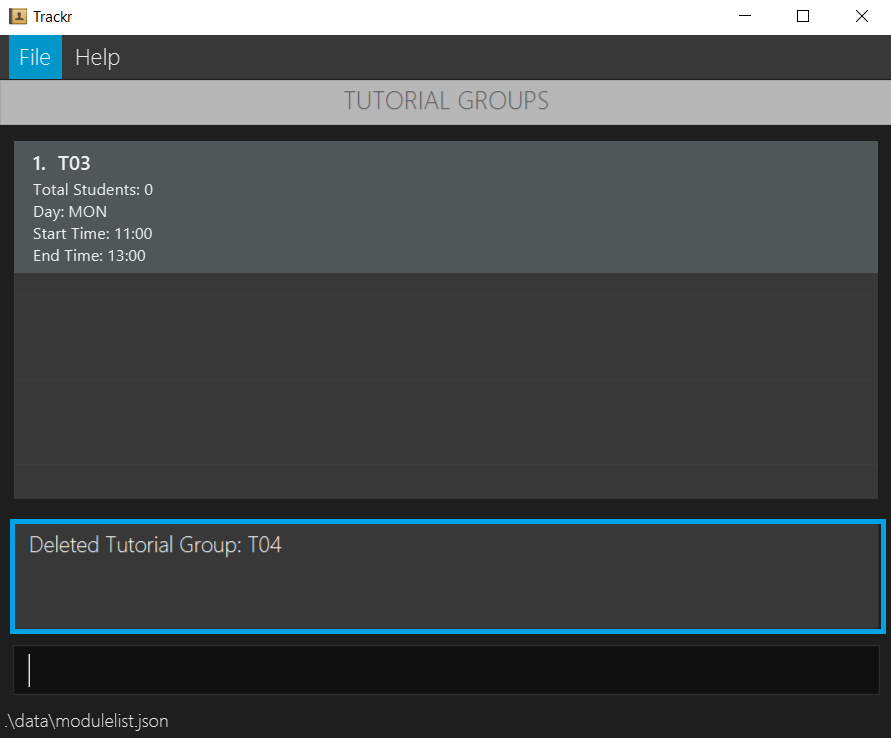
Figure 4.4.2a Expected outcome of performing the deleteTG command
4.4.3 Edit a tutorial group: editTG
Edits a module with the provided details.
Format: editTG INDEX [tg/TG_CODE] [day/DAY_OF_WEEK] [start/START_TIME] [end/END_TIME]
Note:
INDEXrefers to the index number shown in the Student view.INDEXmust be a positive integer starting from 1.- At least one of the optional fields must be provided.
- Existing values will be updated to the given values.
Example:
-
Edits the first tutorial group to be T03, takes place every MON from 11:00 to 13:00.
editTG 1 tg/T03 day/MON start/11:00 end/13:00
Expected Outcome:
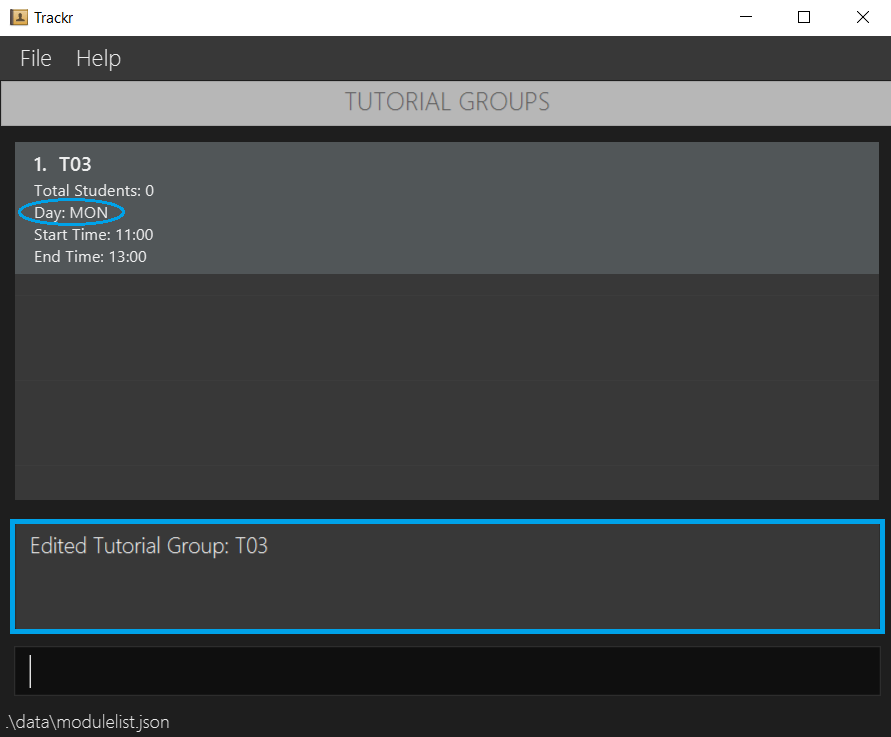
Figure 4.4.3a Expected outcome of performing the editTG command
4.4.4 Find a tutorial group: findTG
Finds and lists all tutorial groups in the current Tutorial Group view whose tutorial group code contains any of the given keywords.
Format: findTG KEYWORD
Note:
KEYWORDshould not be blank.KEYWORDis not case-sensitive (e.g. t05 will match T05).- The search will look for matches, including partial match, in the tutorial group’s code (e.g. t will match T05, however, t5 will not match T05).
- If no tutorial groups matching the keyword are found, the Tutorial Group view will be empty.
Example:
-
Finds a tutorial group with
KEYWORDT03.findTG T03
Expected Outcome:
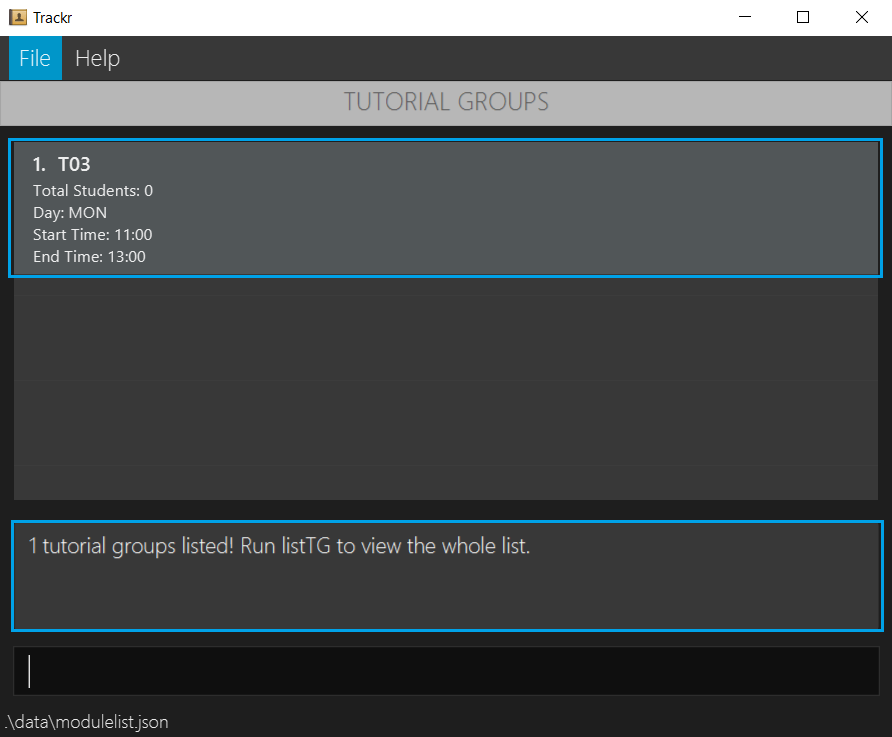
Figure 4.4.4a Expected outcome of performing the findTG command
4.5 Student Features
(written by: Jian Fanmin)
You should perform the following features while in the Student view.
4.5.1 Add a student: addStudent
Adds a student with your provided details.
Format: addStudent n/NAME p/PHONE e/EMAIL id/STUDENT_ID [t/TAG]...
Note:
- Students should not share the same
STUDENT_IDwithin the same tutorial group.NAMEshould not be blank and only contain alphanumeric characters.PHONEshould only contain numbers, and it should be at least 3 digits long.STUDENT_IDbegin and end with a capital letter and should have 7 digits (e.g. A1243567X).- A student can have any number of
TAG, including 0.
Example:
- Adds a student called John Tan with phone number 81234567, email johntan@u.nus.edu, student id A1234567X
and tag student to the student list.
addStudent n/John Tan p/81234567 e/johntan@u.nus.edu id/A1234567X t/student
Expected Outcome:
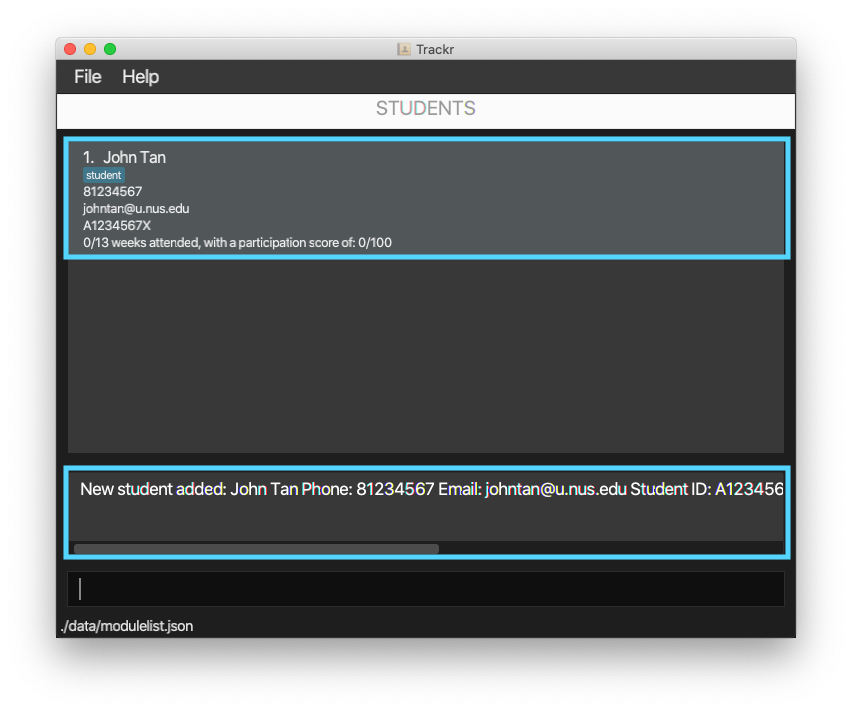
Figure 4.5.1a Expected outcome of performing the addStudent command
4.5.2 Delete a student: deleteStudent
Deletes a student based on the given INDEX.
Format: deleteStudent INDEX
Note:
INDEXrefers to the index number shown in the Student view.INDEXmust be a positive integer starting from 1.- Deleting a student is irreversible.
Example:
-
Deletes the second student in the student list.
deleteStudent 2
Expected Outcome:
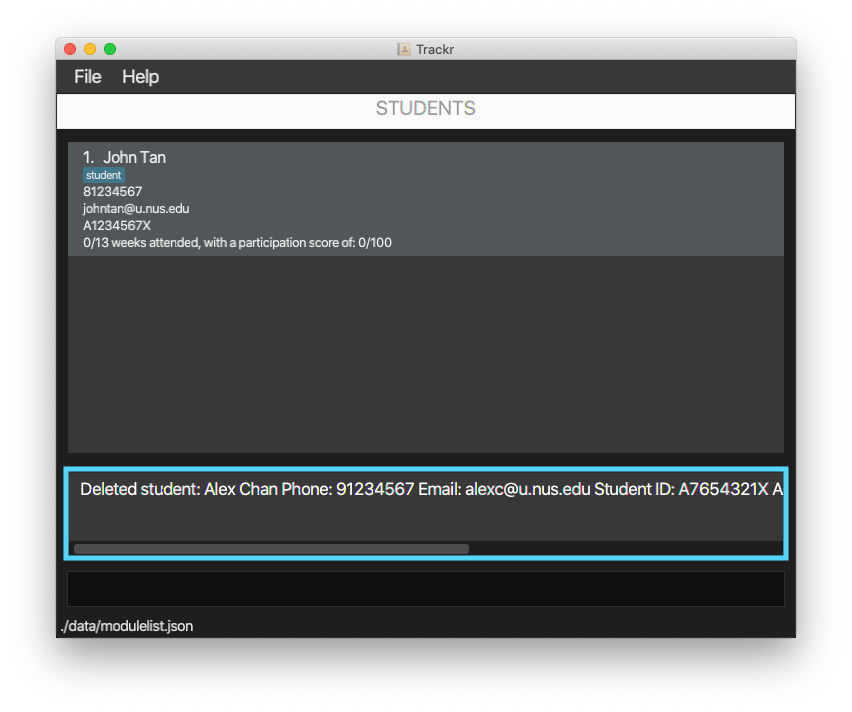
Figure 4.5.2a Expected outcome of performing the deleteStudent command
4.5.3 Edit a student: editStudent
Edits a student at the given INDEX with the provided details.
Format: editStudent INDEX [n/NAME] [p/PHONE] [e/EMAIL] [id/STUDENT_ID] [t/TAG]...
Note:
INDEXrefers to the index number shown in the Student view.INDEXmust be a positive integer starting from 1.- At least one of the optional fields must be provided.
- Existing values will be updated to the given values.
- When you edit the tag(s), the existing tag(s) of the student will be replaced (adding of tag(s) is not cumulative).
- You may wish to remove all the student’s tags by typing
t/without specifying any tags after it.
Example:
-
Edits the phone number and email address of the first student to be 97654321 and jtan@u.nus.edu.
editStudent 1 p/97654321 e/jtan@u.nus.edu
Expected Outcome:
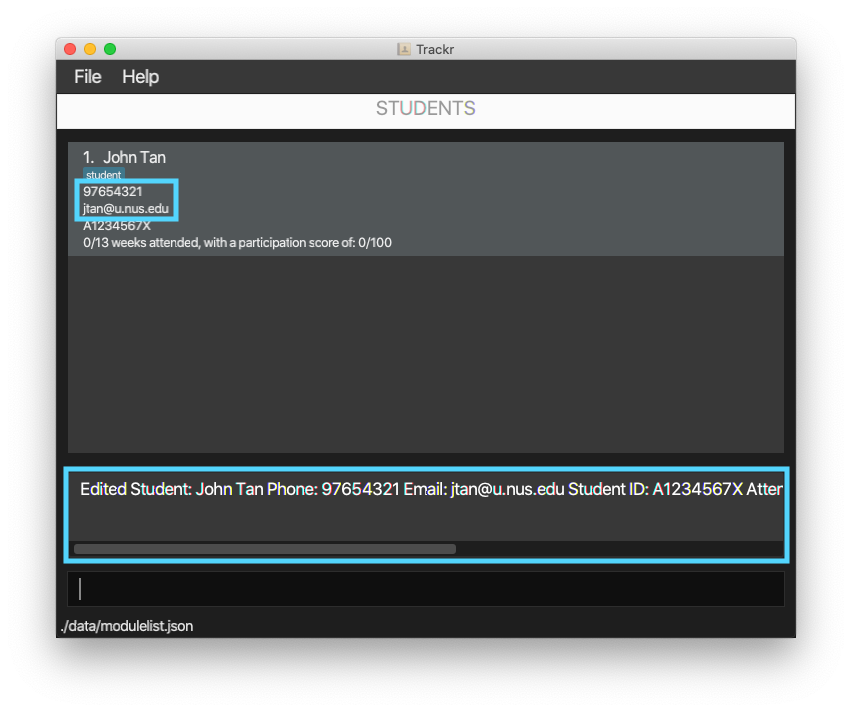
Figure 4.5.3a Expected outcome of performing the editStudentcommand
4.5.4 Find a student: findStudent
Finds and lists all students in the current Student view whose name contains any of the given keywords.
Format: findStudent KEYWORD [KEYWORD]...
Note:
KEYWORDshould not be blank.KEYWORDis not case-sensitive (e.g. john will match John).- The search will look for matches, including partial match, in the student’s name (e.g. jo will match John, however, jhn will not match John).
- If no student matching the keyword is found, the Student view will be empty.
Example:
-
Finds a student with
KEYWORDjohn.findStudent john
Expected Outcome:
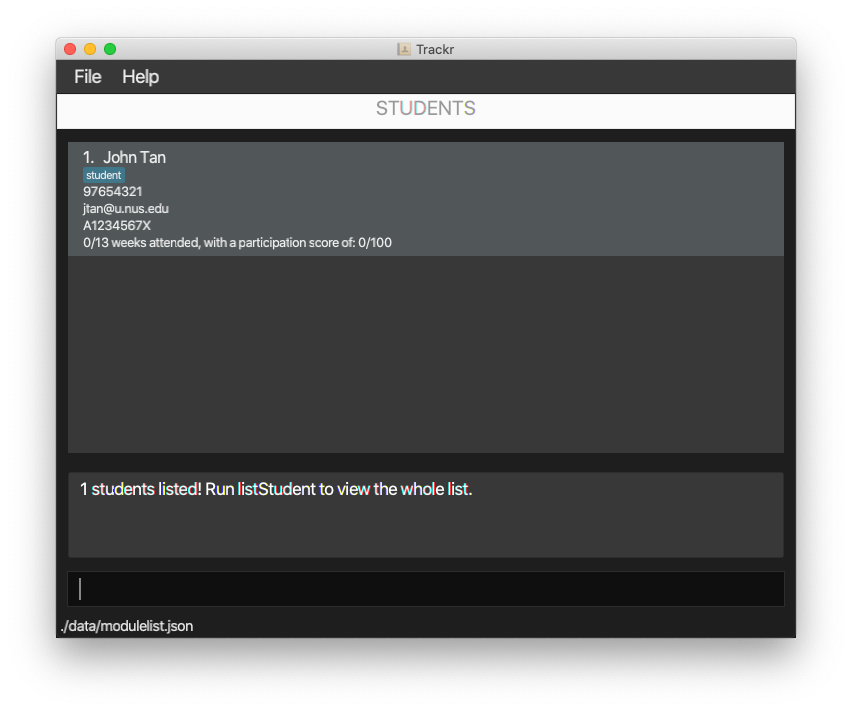
Figure 4.5.4a Expected outcome of performing the findStudent command
4.6 Attendance Features
(written by: Ethan Rozario)
You should perform the following features while in the Student view.
4.6.1 Add attendance: addAttendance
Adds the attendance of a student for specific week(s). Can also be seen as marking a student as ‘present’ for specific week(s).
Format: addAttendance INDEX week/WEEK_NUMBER [week/WEEK_NUMBER]...
Note:
INDEXrefers to the index number shown in the Student view.INDEXmust be a positive integer starting from 1.- You can provide more than one WEEK_NUMBER to mark attendance for multiple weeks.
- Marking attendance for weeks that have already been marked as ‘present’ will not make any changes for those weeks.
Example:
-
Adds the attendance of the first student on the student list for
WEEK_NUMBER2 andWEEK_NUMBER3.addAttendance 1 week/2 week/3
Expected Outcome:
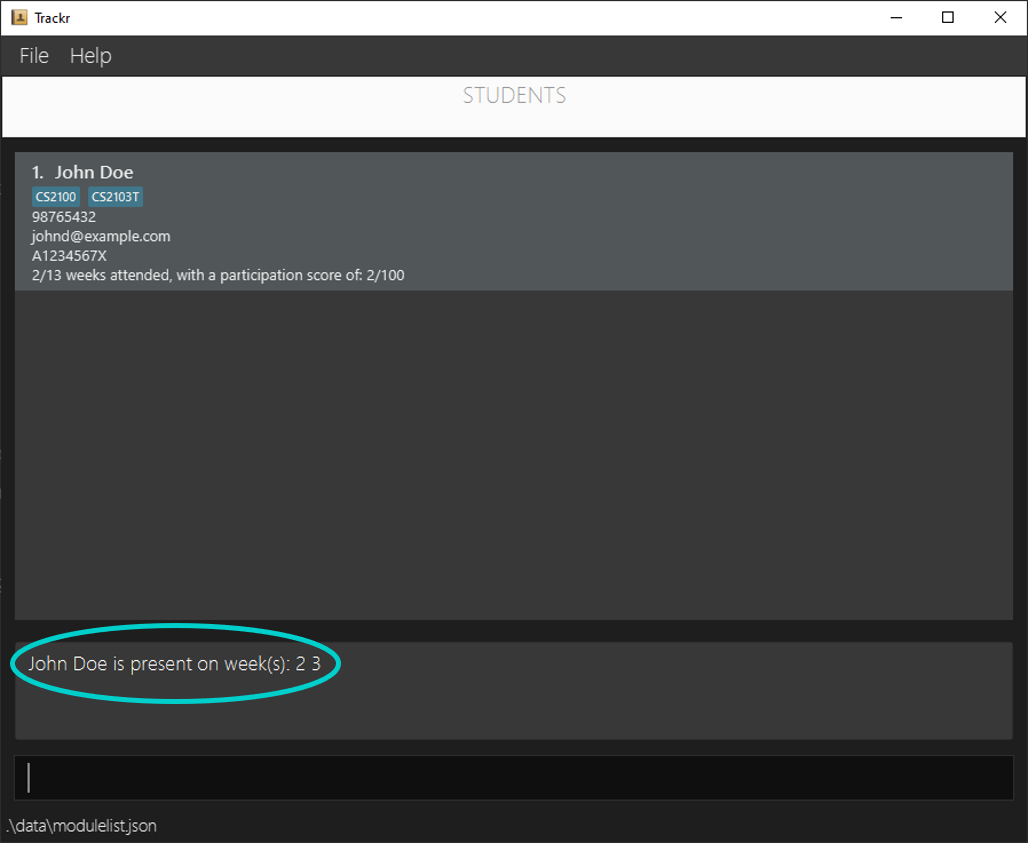
Figure 4.6.1a Expected outcome of performing the addAttendance command
4.6.2 Delete attendance: deleteAttendance
Deletes the attendance of a student for specific week(s). Can also be seen as marking a student as ‘absent’ for specific week(s).
Format: deleteAttendance INDEX week/WEEK_NUMBER [week/WEEK_NUMBER]...
Note:
INDEXrefers to the index number shown in the Student view.INDEXmust be a positive integer starting from 1.- You can provide more than one WEEK_NUMBER to mark attendance for multiple weeks.
- Marking attendance for weeks that have already been marked as ‘absent’ will not make any changes for those weeks.
Example:
-
Deletes the attendance of the first student on the student list for
WEEK_NUMBER3. (The student initially was present on week 2 and week 3.)deleteAttendance 1 week/3
Expected Outcome:
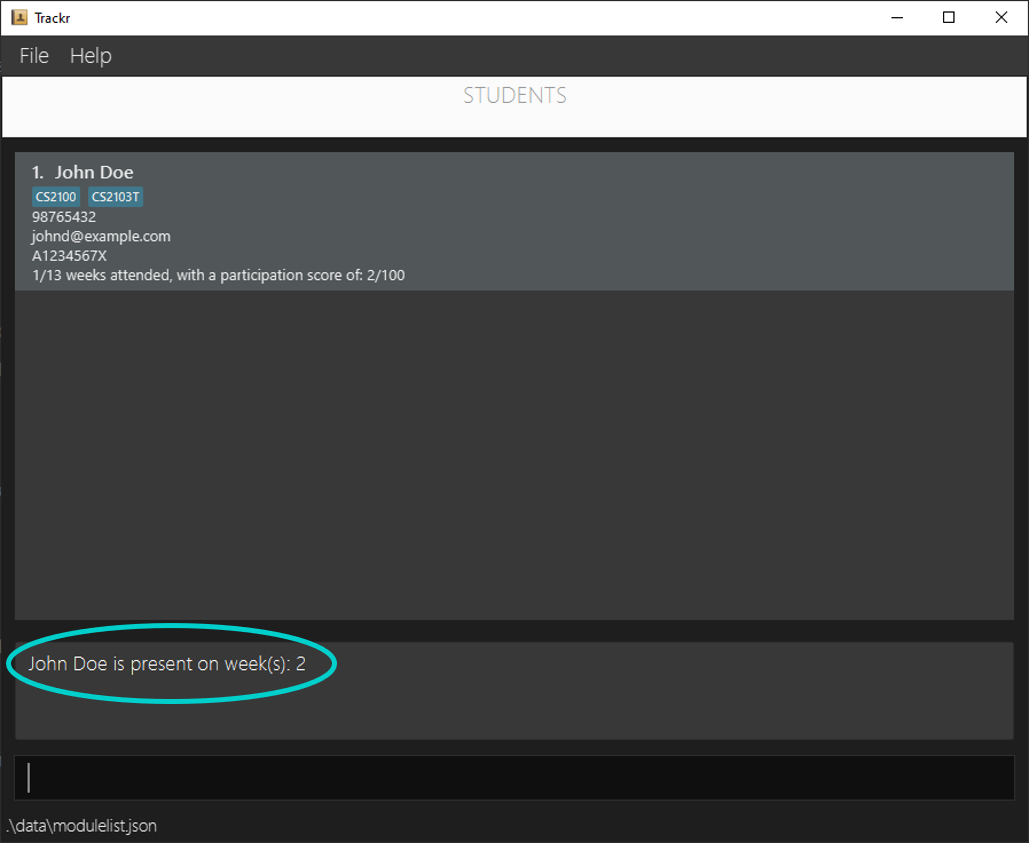
Figure 4.6.2a Expected outcome of performing the deleteAttendance command
4.6.3 View all attendance of a student: viewAttendance
Shows the attendance of target student by specifying the week(s) that the student has attended.
Format: viewAttendance INDEX
Note:
INDEXrefers to the index number shown in the Student view.INDEXmust be a positive integer starting from 1.
Example:
- Views the attendance of the first student on the student list.
viewAttendance 1
Expected Outcome:
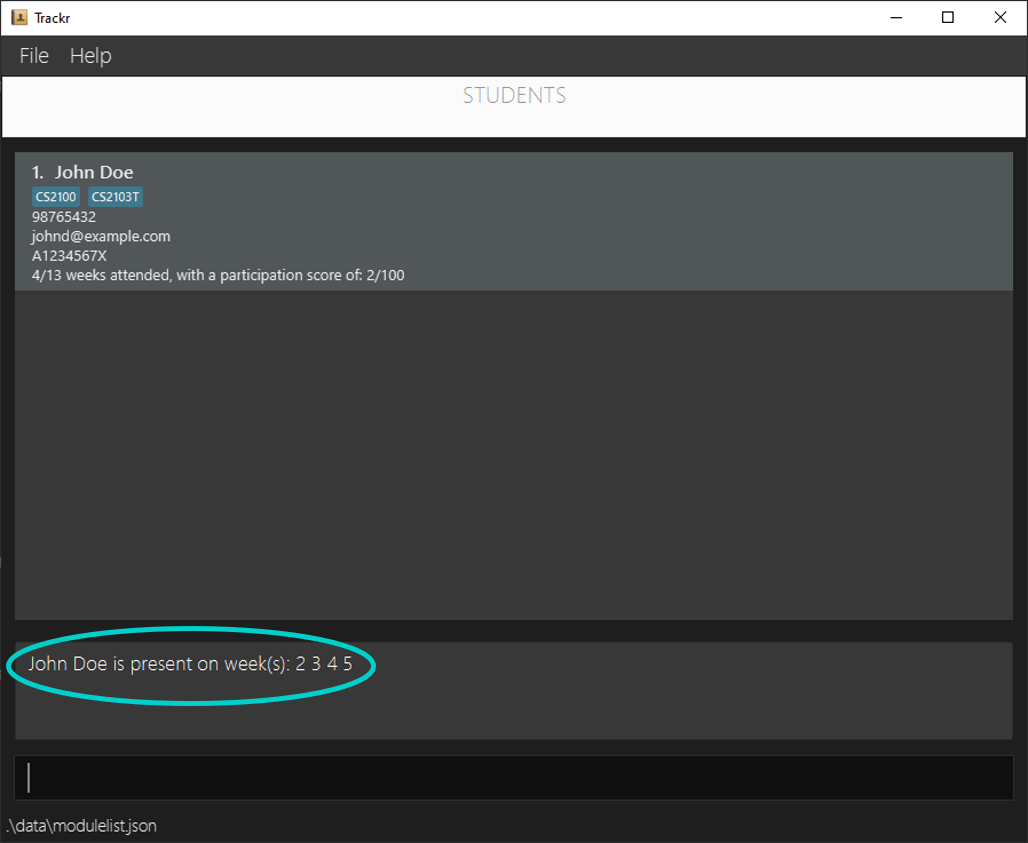
Figure 4.6.3a Expected outcome of performing the viewAttendance command
4.6.4 Show students who fall below an attendance score: attendanceBelow
Finds and lists all students in the current Student view whose attendance score falls below the provided score.
Format: attendanceBelow UPPER_BOUND
Note:
- This command finds students who has an attendance score below
UPPER_BOUND.UPPER_BOUNDmust be a positive integer starting from 1.- The students found will not include those whose attendance score is equal to
UPPER_BOUND, only below, i.e.UPPER_BOUNDis not inclusive.
Example:
- Shows all students who has an attendance score below 5.
attendanceBelow 5
Expected Outcome:
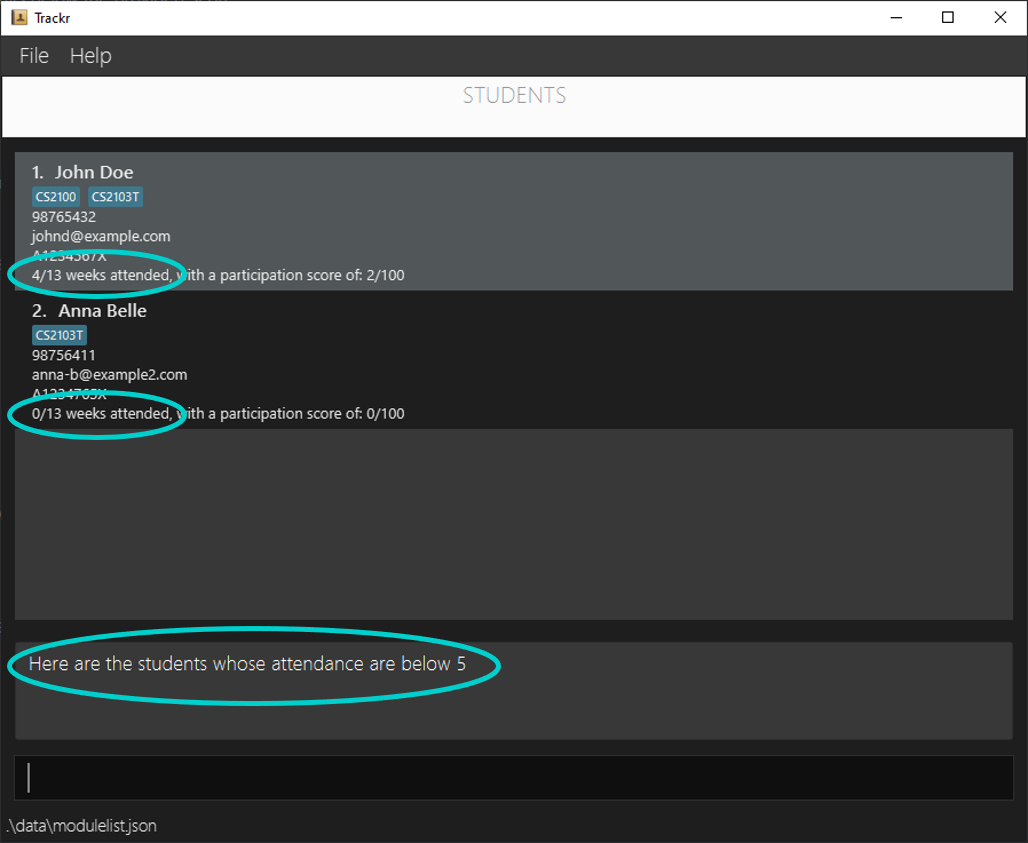
Figure 4.6.4a Expected outcome of performing the attendanceBelow command
4.6.5 Edit a student’s participation: editParticipation
Edits the participation score of a student by adding to or deducting from their existing score by the provided score.
Format: editParticipation INDEX score/PARTICIPATION_SCORE
Note:
INDEXrefers to the index number shown in the Student view.INDEXmust be a positive integer starting from 1.- You can deduct score from a student by putting a negative number for
PARTICIPATION_SCORE(e.g. Put -10 asPARTICIPATION_SCOREto deduct 10 score from a student)PARTICIPATION_SCOREmust be a whole number ranging from -100 to 100, using 0 will have no effect on the existing score.- Students can have a participation score from 0 to 100, adding or deducting score to one outside this range will cause the score to clip to the limits (e.g. Deducting 40 score from a student with a score of 30 will lead to the student having the score of 0 instead of -10)
Example:
- Adds 10 score to the first student on the student list.
editParticipation 1 score/10
Expected Outcome:
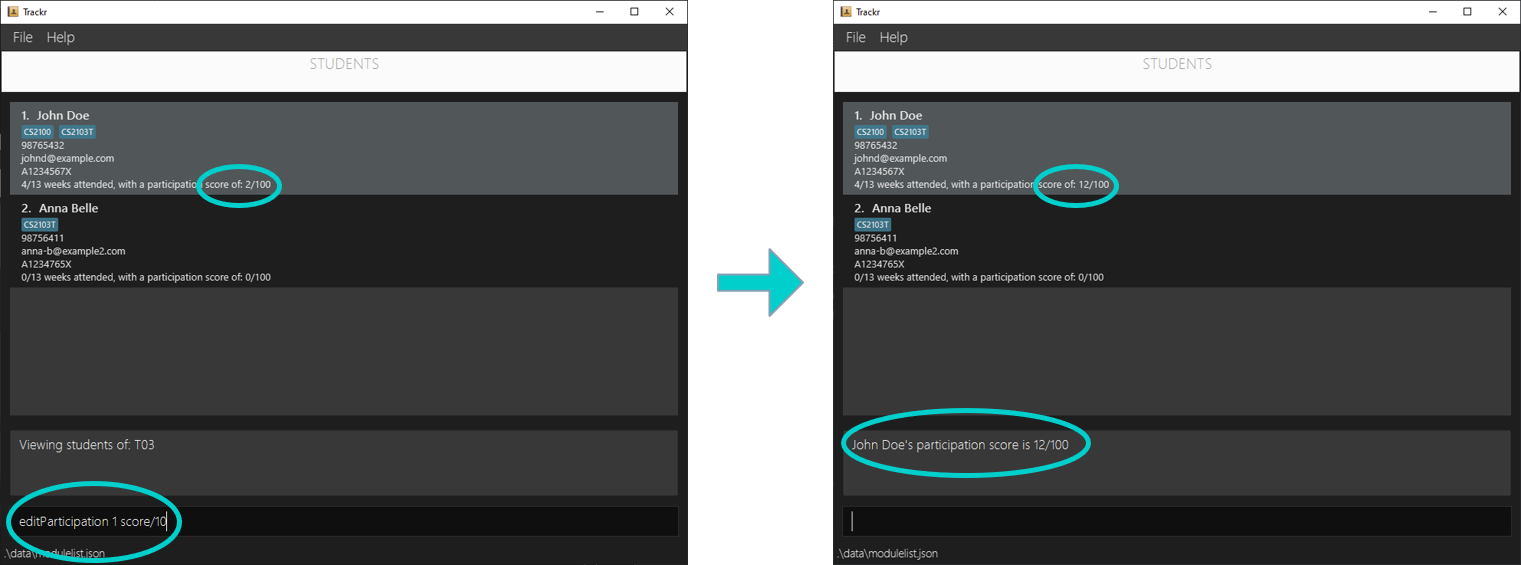
Figure 4.6.5a Expected outcome of performing the editParticipation command
4.6.6 Show students who fall below a participation score: participationBelow
Finds and lists all students in the current Student view whose participation score falls below the provided score.
Format: participationBelow UPPER_BOUND
Note:
- This command finds students who has an participation score below
UPPER_BOUND.UPPER_BOUNDmust be a positive integer starting from 1.- The students found will not include those whose participation score is equal to
UPPER_BOUND, only below, i.e.UPPER_BOUNDis not inclusive.
Example:
- Shows all students who has a participation score below 35.
participationBelow 35
Expected Outcome:
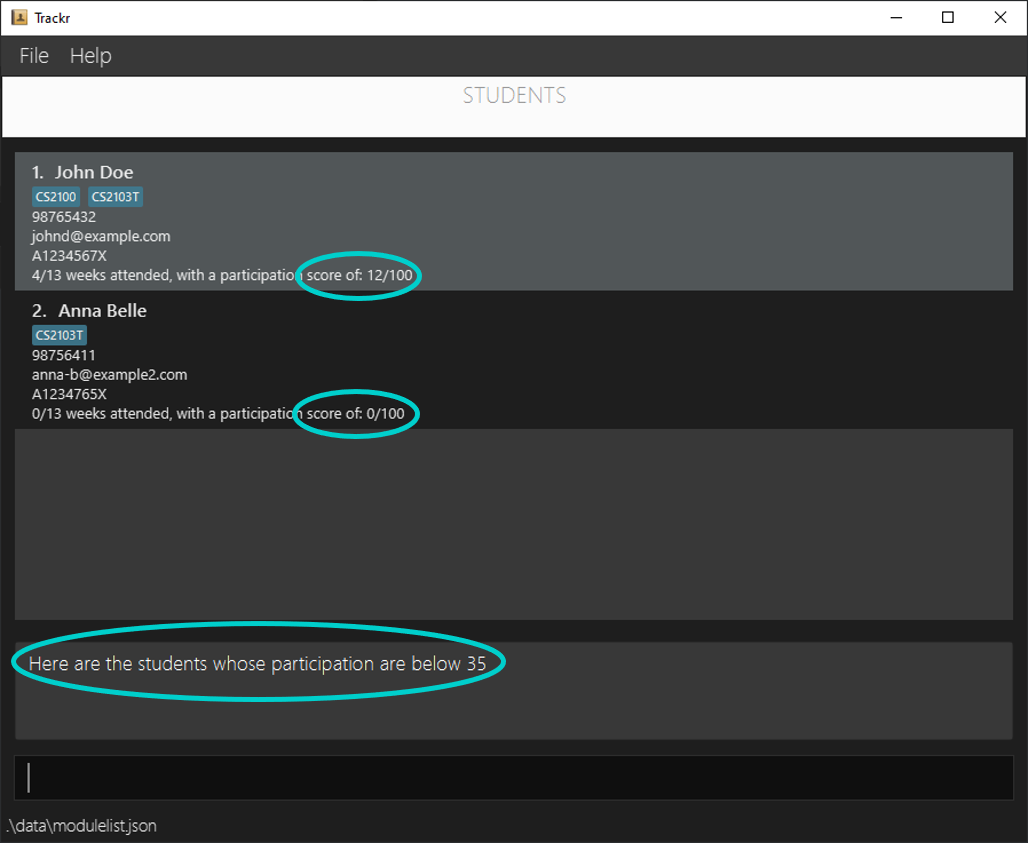
Figure 4.6.6a Expected outcome of performing the participationBelow command
5. FAQ
Q: Why did the command I input change colour from white to red?
A: This happens when the input command is of the wrong syntax or does not exist. You may go to the
Command Format to view the list of commands and their accepted formats.
Q: How do I save my data?
A: When you issue a new command, Trackr automatically updates the local save file immediately. This ensures that
no data will be lost when you close the app or even in the event of a crash.
Q: How do I exit the app safely?
A: To close the app, simply click the red X on the top right for Windows users, on the top left
for MacOS and Linux users.
6. Command Summary
6.1 General Commands
(written by: Sean Tay)
| Command | Description | Compatible View |
|---|---|---|
help |
Shows a message explaining how to access the user guide | ANY |
clear |
Clears all data inside Trackr | ANY |
exit |
Exits Trackr and automatically saves data | ANY |
6.2 Navigation Commands
(written by: Sean Tay)
| Command | Description | Compatible View |
|---|---|---|
listMod |
Lists all the modules in the Module view | ANY |
viewTG INDEX |
Shows the tutorial group list of a target module | MODULE |
listTG |
Lists all tutorial groups in the Tutorial Group view | TUTORIAL GROUP |
viewStudent INDEX |
Shows the student list of a target tutorial group | TUTORIAL GROUP |
listStudent |
Lists all students in the Student view | STUDENT |
prevView |
Returns to the previous view | ANY |
6.3 Module Commands
(written by: Juan Davin Lie)
| Command | Description | Compatible View |
|---|---|---|
addMod m/MODULE_CODE |
Adds a new module to the current Module view | MODULE |
deleteMod INDEX |
Deletes a module from the current Module view | MODULE |
editMod INDEX m/MODULE_CODE |
Edits the module code in the specified index to be the new module code | MODULE |
findMod KEYWORD |
Finds module(s) that contain the keyword in the current Module view | MODULE |
6.4 Tutorial Group Commands
(written by: Tan Eu Zin)
| Command | Description | Compatible View |
|---|---|---|
addTG tg/TG_CODE day/DAY_OF_WEEK start/START_TIME end/END_TIME |
Adds a Tutorial Group to a Module | TUTORIAL GROUP |
deleteTG INDEX |
Deletes a Tutorial Group from a Module | TUTORIAL GROUP |
editTG INDEX [tg/TG_CODE] [day/DAY_OF_WEEK] [start/START_TIME] [end/END_TIME] |
Edits a Tutorial Group from a Module | TUTORIAL GROUP |
findTG KEYWORD |
Finds all Tutorial Groups containing the keyword | TUTORIAL GROUP |
6.5 Student Commands
(written by: Jian Fanmin)
| Command | Description | Compatible View |
|---|---|---|
addStudent n/NAME p/PHONE_NUMBER e/EMAIL id/STUDENT_ID [t/TAG]... |
Adds a new student to the current Student view | STUDENT |
deleteStudent INDEX |
Deletes a student from the current Student view | STUDENT |
editStudent INDEX [n/NAME] [p/PHONE_NUMBER] [e/EMAIL] [id/STUDENT_ID] [t/TAG]... |
Edits a student in the current Student view | STUDENT |
findStudent KEYWORD |
Finds student(s) whose name(s) contain the keyword in the current Student view | STUDENT |
6.6 Attendance Commands
(written by: Ethan Rozario)
| Command | Description | Compatible View |
|---|---|---|
addAttendance INDEX week/WEEK_NUMBER [week/WEEK_NUMBER]... |
Adds the attendance of a student for specific week(s) | STUDENT |
deleteAttendance INDEX week/WEEK_NUMBER [week/WEEK_NUMBER]... |
Deletes the attendance of a student for specific week(s) | STUDENT |
viewAttendance INDEX |
Shows the attendance of target student by specifying the week(s) that the student has attended | STUDENT |
attendanceBelow UPPER_BOUND |
Finds and lists all students in the current Student view whose attendance score falls below the provided score | STUDENT |
editParticipation INDEX score/PARTICIPATION_SCORE |
Edits the participation score of a student by adding to or deducting from their existing score by the provided score | STUDENT |
participationBelow UPPER_BOUND |
Finds and lists all students in the current Student view whose participation score falls below the provided score. | STUDENT |