Developer Guide
by Team W12-2
Table of Contents
- Section 1 - Preface
- Section 2 - Using this document
- Section 3 - Setting up, getting started
- Section 4 - Design
-
Section 5 - Implementation
- 5.1 - Add Commands -
addMod,addTGandaddStudent - 5.2 - Delete Commands -
deleteMod,deleteTGanddeleteStudent - 5.3 - Edit Commands -
editMod,editTGandeditStudent - 5.4 - Find Commands -
findMod,findTGandfindStudent - 5.5 - List Commands -
listMod,listTGandlistStudent - 5.6 - View Commands -
viewTGandviewStudent - 5.7 - Clear Command -
clear - 5.8 - Exit Command -
exit - 5.9 - Data saving and loading
- 5.1 - Add Commands -
- Section 6 - Documentation, logging, testing, configuration, dev-ops
- Appendix A - Product Scope
- Appendix B - User Stories
- Appendix C - Use Cases
- Appendix D - Non-Functional Requirements
- Appendix E - Glossary
- Appendix F - Instructions for Manual Testing
Section 1 - Preface
Trackr is a desktop module management application made for Teaching Assistants of all faculties. It is designed with a focus on the Command Line Interface (CLI), while still retaining the benfits of a simple yet intuitive Graphical User Interface (GUI). Trackr allows Teaching Assistants to keep track of Modules, Tutorial Groups, and Students they teach all in one location.
Section 2 - Using this Document
This Developer Guide will help you understand the thought processes behind the design and implementation of Trackr. It will begin with how to get started, followed by the design and implementation, and ending with the documentation for this project.
This section will provide you the formatting used in this throughout the document so that understand in quick and simple. For more information on confusing terms encountered, you can check the glossary for clarification.
Section 2.2 - Formatting
This document is written in a manner where formatting is applied to text in order to convey different meanings. The table below will explain what these formatting uses are, what they look like, and what they mean in the context of the document.
| Formatting | Meaning |
|---|---|
code |
Words in ‘code’ format refer to class names or fields within classes. |
| Italics | Words in italics refer to the type of diagrams used. |
| Underline | Words that are in blue and underlined when hovered over refer to hyperlinks. Hyperlinks are clickable, and bring you either to different parts of this document or to external websites, for the convenience of navigating quickly to different parts of the document or the web. |
| Bold | Words in bold refer to important points within the document. |
Section 3 - Setting up, getting started
Refer to the guide Setting up and getting started.
Section 4 - Design
Section 4.1 - High-Level Architecture

The Architecture Diagram given above explains the high-level design of Trackr. Given below is a quick overview of each component.
Main has two classes called Main and MainApp. It is responsible for,
- at app launch: Initializes the components in the correct sequence, and connects them up with each other.
- at shut down: Shuts down the components and invokes clean-up methods where necessary.
Commons represents a collection of classes used by multiple other components.
The rest of the App consists of four components.
-
UI: The UI of the App. -
Logic: The command executor. -
Model: Holds the data of the App in memory. -
Storage: Reads data from, and writes data to, the hard disk.
Each of the four components,
- defines its API in an
interfacewith the same name as the Component. - exposes its functionality using a concrete
{Component Name}Managerclass (which implements the corresponding APIinterfacementioned in the previous point.
For example, the Logic component (see the class diagram given below) defines its API in the Logic.java interface and exposes its functionality using the LogicManager.java class which implements the Logic interface.

How the architecture components interact with each other
The Sequence Diagram below shows how the components interact with each other for the scenario where the user issues the command delete 1.

The sections below give more details of each component.
Section 4.2 - UI component

API :
Ui.java
The UI Component defines what the user will see and interact with while using Trackr.
MainWindow is made up of parts e.g.CommandBox, ResultDisplay, ModuleListPanel, StatusBarFooter, ViewDisplay etc.
All these, including the MainWindow, inherit from the abstract UiPart class. The UI component uses JavaFx UI framework.
The layout of these UI parts are defined in matching .fxml files that are in the src/main/resources/view folder.
For example, the layout of the MainWindow
is specified in MainWindow.fxml
The UI component,
- executes user commands using the
Logiccomponent. - listens for changes to
Modeldata so that theUIcan be updated with the modified data.
Section 4.3 - Logic component

API :
Logic.java
The Logic component contains the TrackrParser object that creates Parser objects for each Command based on the user input taken from the UI component. The Parser object will break down the user input to obtain the arguments, and either create the corresponding Command object or throw an exception in the case of invalid inputs for the arguments. The Logic component also contains the Model component which allows for execution of the created Command.
-
Logicuses theTrackrParserclass to parse the user command. - This results in a
Commandobject which is executed by theLogicManager. - The command execution can affect the
Model(e.g. adding a student to a tutorial group). - The result of the command execution is encapsulated as a
CommandResultobject which is passed back to theUi. - In addition, the
CommandResultobject can also instruct theUito perform certain actions, such as displaying help to the user.
Given below is the Sequence Diagram for interactions within the Logic component for the execute("deleteTG 1") API call.

DeleteTutorialGroupCommandParser should end at the destroy marker (X) but due to a limitation of PlantUML, the lifeline reaches the end of diagram.
Section 4.4 - Model component

API : Model.java
The Model component contains the Trackr object, that handles the main type of data in the app, which is in the form of a list of Module objects. The Module object contains a list of TutorialGroup objects, and the TutorialGroup objects contains a list of Student objects. The ModelManager class exposes the methods which allows for the manipulation of this data (e.g. Editing a Module object’s ModuleId object, deleting a TutorialGroup object, adding participation score for a Student object).
The Model component,
- stores a
UserPrefobject that represents the user’s preferences. - stores the Trackr data.
- exposes unmodifiable
ObservableList<Module>,ObservableList<TutorialGroup>andObservableList<Student>that can be ‘observed’ e.g. the UI can be bound to this list so that the UI automatically updates when the data in the list change. - does not depend on any of the other three components.
Section 4.5 - Storage component

API : Storage.java
The Storage component contains the JsonModuleListStorage object, which contains the JsonSerializableModuleListStorage which serves as the JSON version of a Trackr object; the main data type in the app. The methods readModuleList() and saveModuleList() convert the JSON objects to and from their native object types respectively (e.g. Converting a JsonAdaptedTutorialGroup object into a TutorialGroup object).
The Storage component,
- can save
UserPrefobjects in json format and read it back. - can save the
Trackrdata in json format and read it back.
Section 4.6 - Common classes
Classes used by multiple components are in the seedu.addressbook.commons package, the package contains 2 sub packages, which are:
- core: Contains software settings and information, also contains loggers for debugging purposes.
- util: Contains utilities for other classes to use. Utilities can perform tasks such as parse strings or convert objects to and from JSON format.
Section 5 - Implementation
This section describes some noteworthy details on how certain features are implemented.
Trackr has three different data types:
-
Module: The current module the user is teaching -
TutorialGroup: The tutorial groups that the user is teaching -
Student: The students currently being taught by the user
As shown in Figure 4.4a, Trackr stores these data in the following manner: UniqueModuleList contains Modules. Each Module has a UniqueTutorialGroupList that stores all the Tutorial Groups of that particular Module. Lastly, each Tutorial Group has a UniqueStudentList that stores all the Students of that particular Tutorial Group.
Trackr’s three data types also share the some commands, which are:
- Add
- Delete
- Edit
- Find
- List
- View
- Clear
- Exit
Since Trackr stores and manages its data recursively, these shared commands for Module, Tutorial Group and Student work in a similar manner.
Design Considerations:
Aspect: List to contain the data types
- Alternative 1: Use a single generic
UniqueListthat contains the data types.- Pros: Code that is easier to maintain due to abstraction.
- Cons: Harder to implement.
- Alternative 2 (Current choice): Use a separate
UniqueListfor each model such asUniqueModuleList.- Pros: Easier to implement.
- Cons: More repetitive code.
Section 5.1 - Add Commands - addMod, addTG and addStudent
Overview
The Add command in Trackr enables users to easily add data types to the app. Users will be able to keep track of data they are in charge of.
Implementation
Each Add command for Module, TutorialGroup, and Student is split into AddModuleCommand, AddTutorialGroupCommand, and AddStudentCommand, respectively.
Each command class extends Command.
Given below is an example of the interaction between the Model and the AddModuleCommand of Trackr.
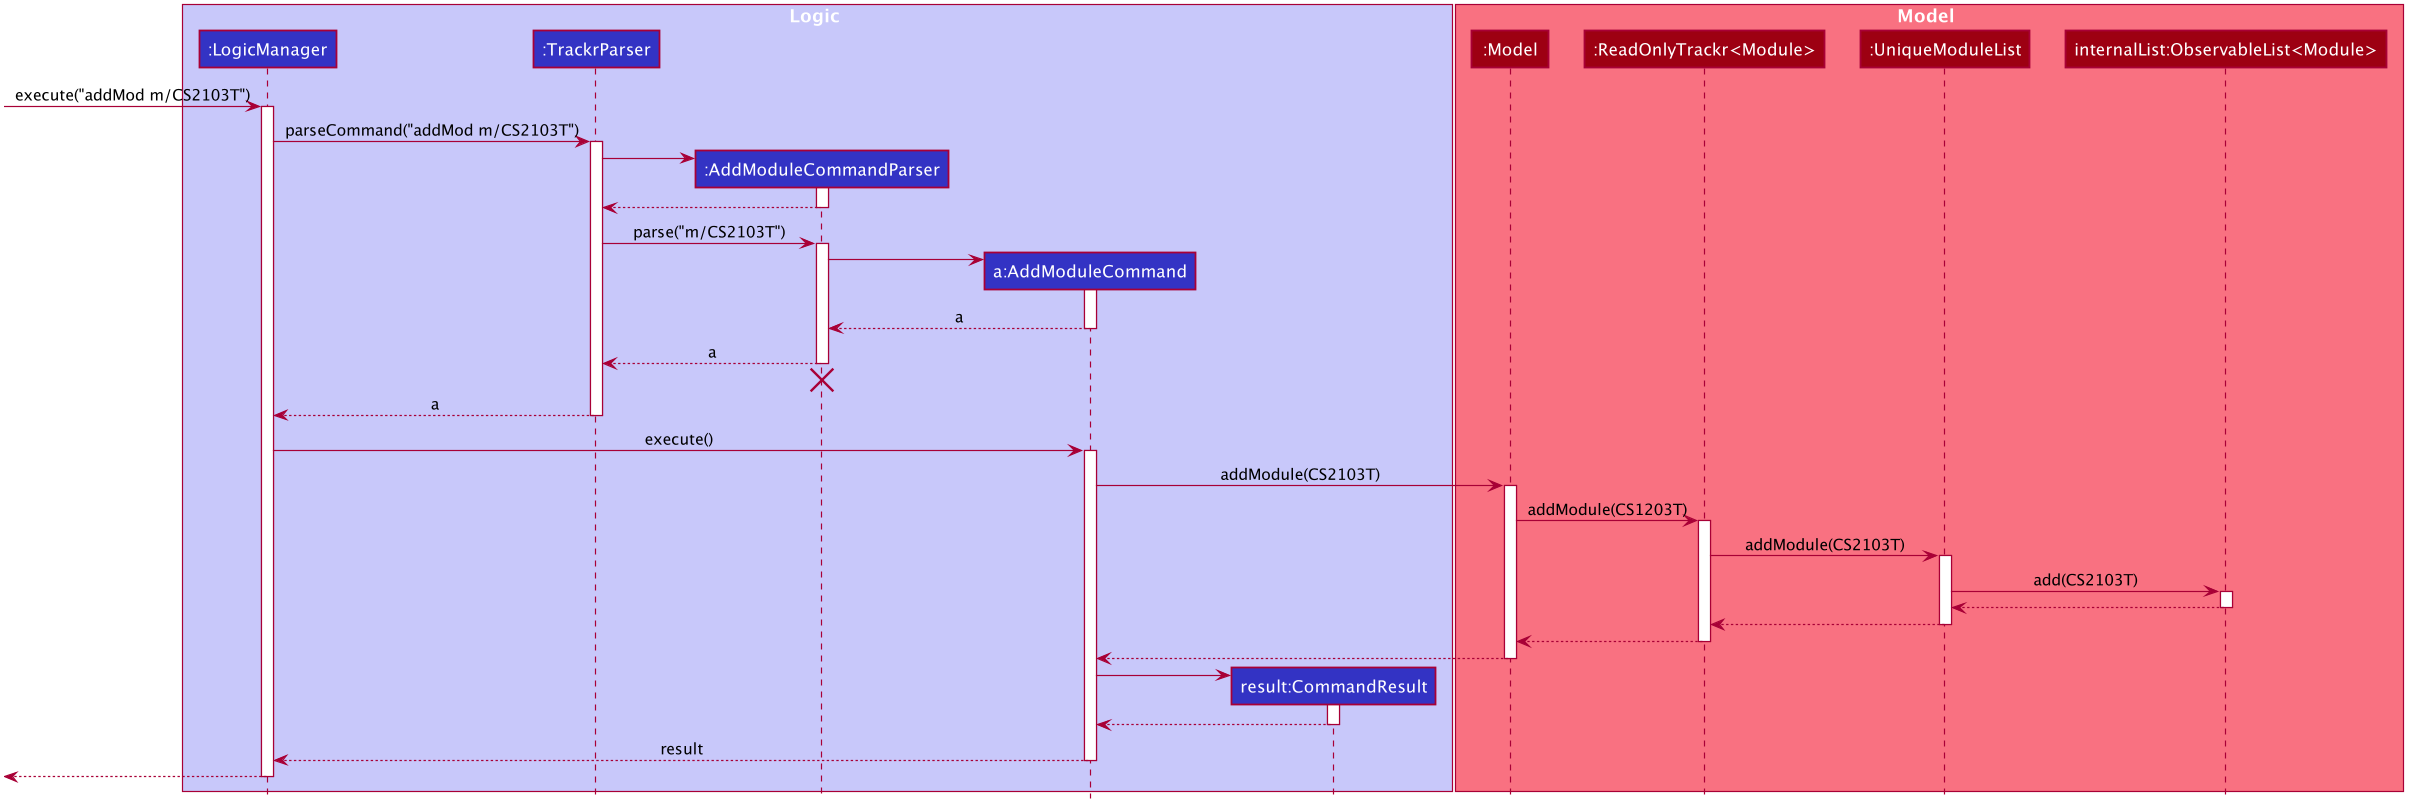
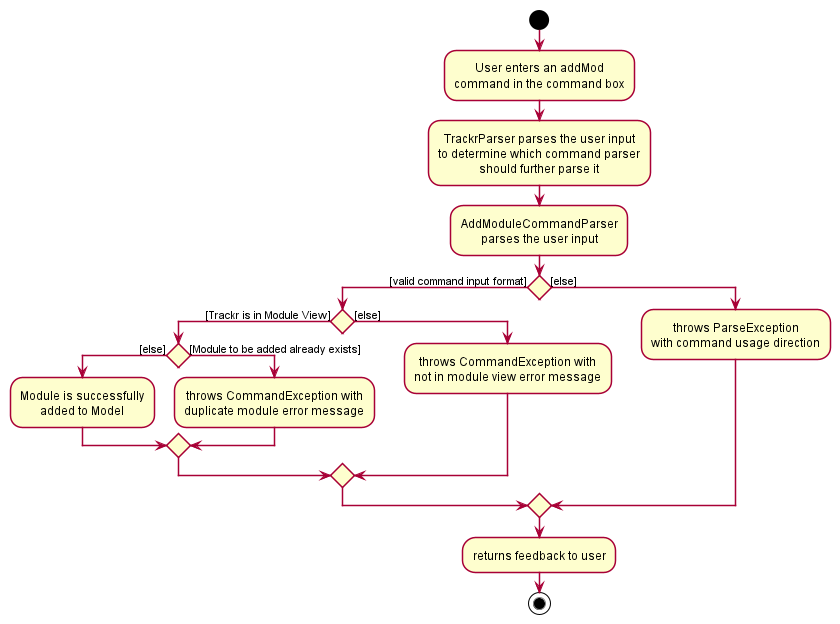
Step 1. The user executes addMod m/CS2103T to add a module called CS2103T to Trackr. The addMod command calls
LogicManager#execute(String).
Step 2. The contents of the String is parsed in AddModuleCommandParser#parse(String). This method creates a new
Module object with the parsed arguments. An AddModuleCommand object is then initialised with this Module object.
Step 3. LogicManager#execute(String) calls the AddModuleCommand#execute(Model) method of the AddModuleCommand
object.
Step 4. Within Model, the method Model#addModule(Module) is executed and this adds the Module to the
internalList of UniqueModuleList.
Step 5. Once the Module has been added to the internaList, AddModuleCommand#execute(Model) creates a
CommandResult object and the CommandResult is returned to LogicManager.
Note: There are some differences for the add commands of
TutorialGroupandStudentduring Step 4.For
TutorialGroup:
- Within each
Module, there is anUniqueTutorialGroupList.- The
Modelwill check if the user is currently in the Tutorial Group View usingModel#isInTutorialGroupView(). This ensures that there is a targetModulefor theTutorialGroupto be added to.Model#addTutorialGroup(TutorialGroup)method then retrieves theUniqueTutorialGroupListof the targetModuleand adds theTutorialGroupto theinternalListof theUniqueTutorialGroupList.For
Student:
- Within each
TutorialGroup, there is anUniqueStudentList.- The
Modelwill check if the user is currently in the Student View usingModel#isInStudentView(). This ensures that there is a targetModuleandTutorialGroupfor theStudentto be added to.Model#addStudent(Student)method then retrieves theUniqueStudentListof the targetModuleandTutorialGroupand adds theStudentto theinternalListof theUniqueStudentList.
Section 5.2 - Delete Commands - deleteMod, deleteTG and deleteStudent
Overview
The Delete command in Trackr enables users to easily delete data types from the app.
Implementation
Each Delete command for Module, TutorialGroup, and Student is split into DeleteModuleCommand, DeleteTutorialGroupCommand, and DeleteStudentCommand, respectively.
Each command class extends Command.
Given below is an example of the interaction between the Model and the DeleteModuleCommand of Trackr.

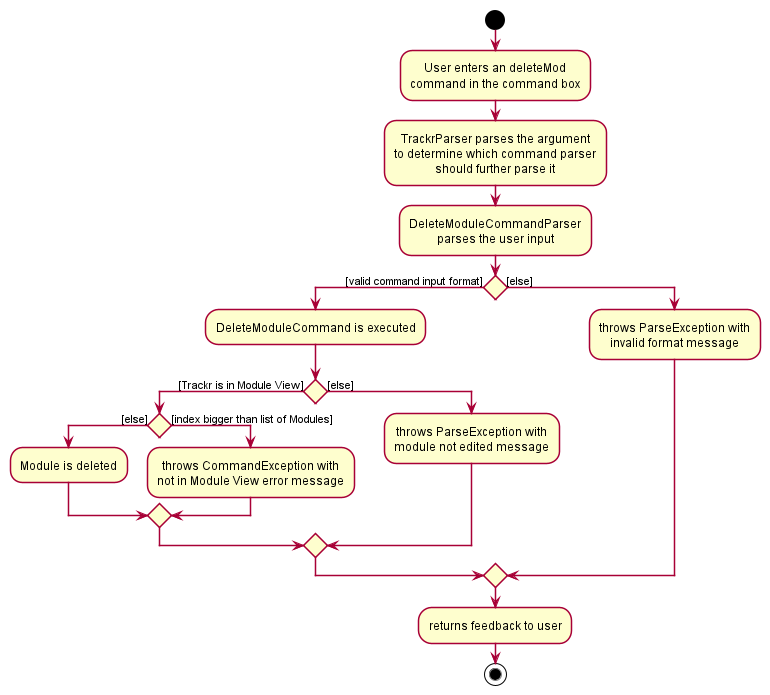
Step 1. The user executes deleteMod 1 to delete the first module in the displayed list. The deleteMod command calls
LogicManager#execute(String).
Step 2. The contents of the String is parsed in DeleteModuleCommandParser#parse(String). This method creates a new
Index object with the parsed arguments. A DeleteModuleCommand object is then initialised with this Index object.
Step 3. LogicManager#execute(String) calls the DeleteModuleCommand#execute(Model) method of the
DeleteModuleCommand object.
Step 4. Within Model, the method Model#deleteModule(Module) is executed and this deletes the Module from the
internalList of UniqueModuleList.
Step 5. Once the Module has been deleted from the internaList, DeleteModuleCommand#execute(Model) creates an
CommandResult object and the CommandResult is returned to LogicManager.
Note: There are some differences for the delete commands of
TutorialGroupandStudentduring Step 4.For
TutorialGroup:
- Within each
Module, there is anUniqueTutorialGroupList.- The
Modelwill check if the user is currently in the Tutorial Group View usingModel#isInTutorialGroupView(). This ensures that there is a targetModulefor theTutorialGroupto be deleted from.Model#deleteTutorialGroup(TutorialGroup)method then retrieves theUniqueTutorialGroupListof the targetModuleand deletes theTutorialGroupfrom theinternalListof theUniqueTutorialGroupList.For
Student:
- Within each
TutorialGroup, there is aUniqueStudentList.- The
Modelwill check if the user is currently in the Student View usingModel#isInStudentView(). This ensures that there is a targetModuleandTutorialGroupfor theStudentto be deleted from.Model#deleteStudent(Student)method then retrieves theUniqueStudentListof the targetModuleandTutorialGroupand deletes theStudentfrom theinternalListof theUniqueStudentList.
Section 5.3 - Edit Commands - editMod, editTG and editStudent
Overview
The Edit command in Trackr enables users to easily edit data types. Users will be able to modify data.
Implementation
Each Edit command for Module, TutorialGroup, and Student is split into EditModuleCommand, EditTutorialGroupCommand, and EditStudentCommand, respectively.
Each command class extends Command.
Given below is an example of the interaction between the Model and the EditModuleCommand of Trackr.

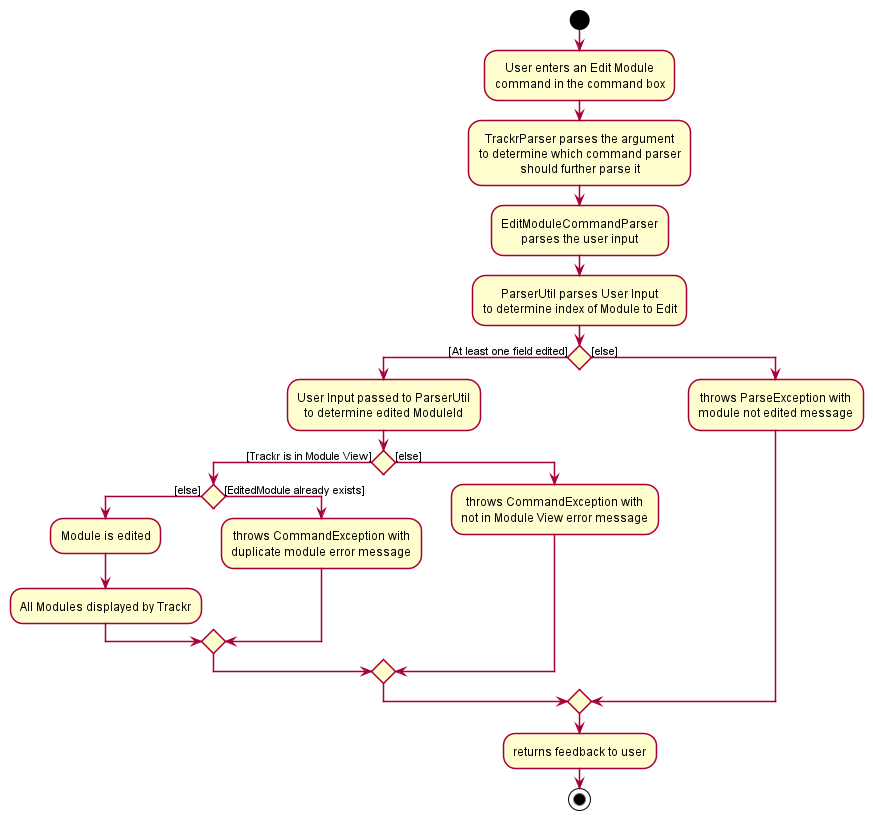
Step 1. The user executes editMod 1 m/CS2100 to edit the first module in the displayed list. The editMod command
calls LogicManager#execute(String).
Step 2. The contents of the String is parsed in EditModuleCommandParser#parse(String). This method creates a new
Index and EditModuleDescriptor object with the parsed arguments. An EditModuleCommand object is then initialised
with the Index and EditModuleDescriptor object.
Step 3. LogicManager#execute(String) calls the EditModuleCommand#execute(Model) method of the EditModuleCommand
object. The method creates a new Module object with the edited fields.
Step 4. Within Model, the method Model#setModule(Module, Module) is executed and this replaces the current Module
from the internalList of UniqueModuleList with the edited one.
Step 5. Once the Module has been edited in the internaList, EditModuleCommand#execute(Model) creates an
CommandResult object and the CommandResult is returned to LogicManager.
Note: There are some differences for the edit commands of
TutorialGroupandStudentduring Step 4.For
TutorialGroup:
- Within each
Module, there is anUniqueTutorialGroupList.- The
Modelwill check if the user is currently in the Tutorial Group View usingModel#isInTutorialGroupView(). This ensures that there is a targetModulefor theTutorialGroupto be edited from.Model#setTutorialGroup(TutorialGroup, TutorialGroup)method then retrieves theUniqueTutorialGroupListof the targetModuleand edits theTutorialGroupin theinternalListof theUniqueTutorialGroupList.For
Student:
- Within each
TutorialGroup, there is aUniqueStudentList.- The
Modelwill check if the user is currently in the Student View usingModel#isInStudentView(). This ensures that there is a targetModuleandTutorialGroupfor theStudentto be edited from.Model#setStudent(Student, Student)method then retrieves theUniqueStudentListof the targetModuleandTutorialGroupand edits theStudentin theinternalListof theUniqueStudentList.
Section 5.4 - Find Commands - findMod, findTG and findStudent
Overview
The Find command in Trackr enables users to easily find data based on keywords. This will save their time whenever they want to find a specific data.
Implementation
Each Find command for Module, TutorialGroup, and Student is split into FindModuleCommand, FindTutorialGroupCommand, and FindStudentCommand, respectively.
Each command class extends Command.
Given below is an example of the interaction between the Model and the FindModuleCommand of Trackr.
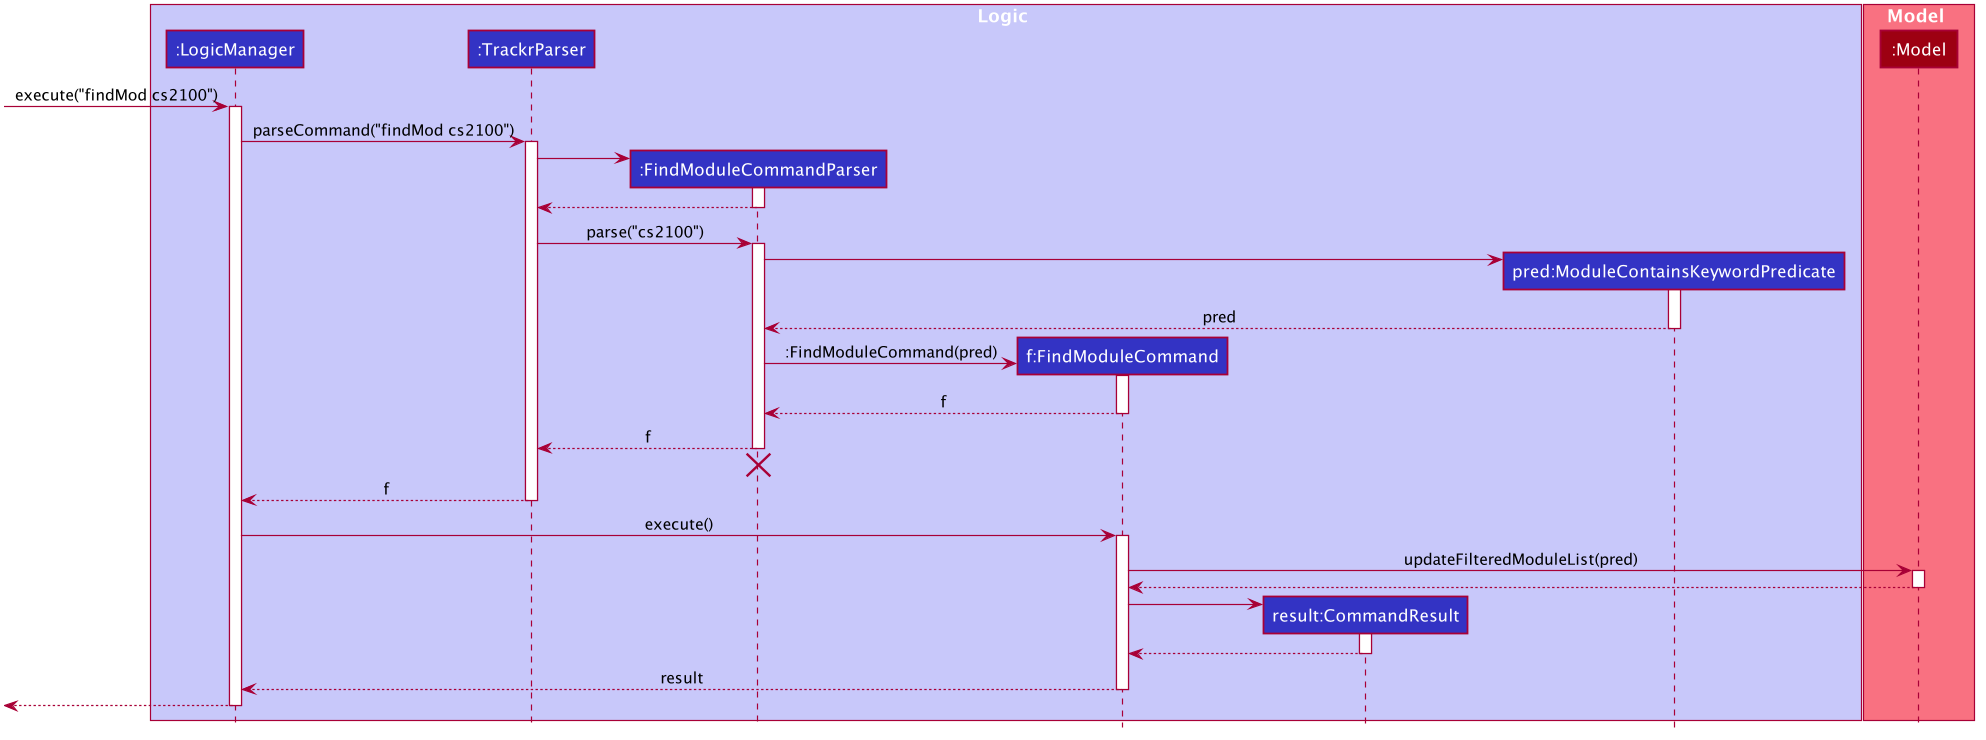
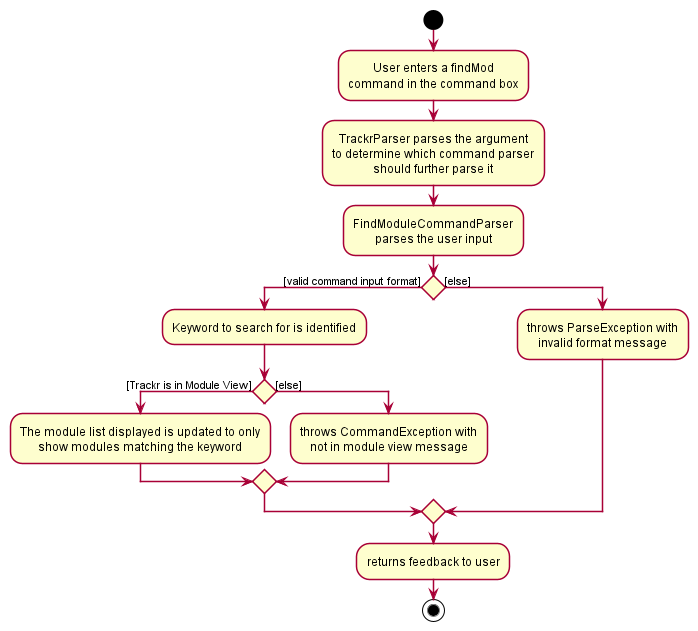
Step 1. The user executes findMod cs2100 to find module(s) that contain the keyword cs2100. The findMod command
calls LogicManager#execute(String).
Step 2. The contents of the String is parsed in FindModuleCommandParser#parse(String). This method creates a new
ModuleContainsKeywordsPredicate object with the parsed arguments. A FindModuleCommand object is then initialised
with the ModuleContainsKeywordsPredicate object.
Step 3. LogicManager#execute(String) calls the FindModuleCommand#execute(Model) method of the FindModuleCommand
object.
Step 4. Within Model, the method Model#updateFilteredModuleList(Predicate<Module>) is executed and this updates
the displayed list of modules.
Step 5. FindModuleCommand#execute(Model) creates a CommandResult object and the CommandResult is returned to
LogicManager.
Note: There are some differences for the find commands of
TutorialGroupandStudentduring Step 4.TutorialGroupalso has its own predicate class calledTutorialContainsKeywordsPredicatewhileStudent’s predicate class is calledNameContainsKeywordsPredicate.For
TutorialGroup:
- Within each
Module, there is anUniqueTutorialGroupList.- The
Modelwill check if the user is currently in the Tutorial Group View usingModel#isInTutorialGroupView(). This ensures that there is a targetModulefor theTutorialGroupto be searched from.Model#updateFilteredTutorialGroupList(Predicate<TutorialGroup>)method then updates the displayed list of tutorial groups.For
Student:
- Within each
TutorialGroup, there is aUniqueStudentList.- The
Modelwill check if the user is currently in the Student View usingModel#isInStudentView(). This ensures that there is a targetModuleandTutorialGroupfor theStudentto be searched from.Model#updateFilteredStudentList(Predicate<Student>)method then updates the displayed list of students.The commands
attendanceBelowandparticipationBelowalso follow similar implementations. Their predicate classes areAttendanceBelowSpecifiedScorePredicateandParticipationBelowSpecifiedScorePredicaterespectively. Like the aforementioned find command forStudent,attendanceBelowandparticipationBelowuses theModel#updateFilteredStudentListmethod to update the displaye list of students.
Section 5.5 - List Commands - listMod, listTG and listStudent
Overview
The List command in Trackr enables users to easily list all data. Users will be able to see all data after using the Find Commands.
Implementation
Each List command for Module, TutorialGroup, and Student is split into ListModuleCommand, ListTutorialGroupCommand, and ListStudentCommand, respectively.
Each command class extends Command.
Given below is an example of the interaction between the Model and the ListModuleCommand of Trackr.
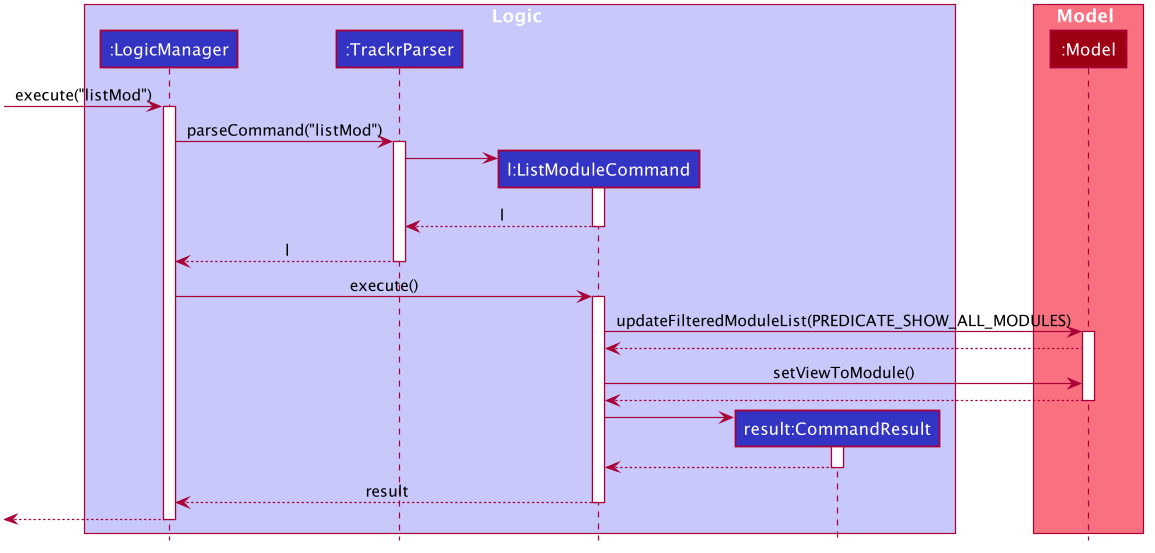
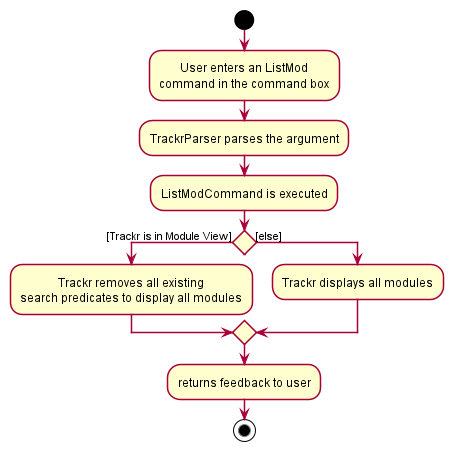
Step 1. The user executes listMod to view all the modules in Trackr. The listMod command calls
LogicManager#execute(String).
Step 2. The contents of the String is parsed in TrackrParser#parseCommand(String). This method creates a new
ListModuleCommand object.
Step 3. LogicManager#execute(String) calls the ListModuleCommand#execute(Model) method of the ListModuleCommand
object.
Step 4. Within Model, the method Model#updateFilteredModuleList(Predicate<Module>) is executed and this displays
all the modules within Trackr.
Step 5. ListModuleCommand#execute(Model) creates a CommandResult object and the CommandResult is returned to
LogicManager.
Note: There are some differences for the list commands of
TutorialGroupandStudentduring Step 4.For
TutorialGroup:
- Within each
Module, there is anUniqueTutorialGroupList.- The
Modelwill check if the user is currently in the Tutorial Group View usingModel#isInTutorialGroupView(). This ensures that there is a targetModulefor theTutorialGroupto be listed from.Model#updateFilteredTutorialGroupList(Predicate<TutorialGroup>)method then displays all the tutorial groups within the targetModule.For
Student:
- Within each
TutorialGroup, there is anUniqueStudentList.- The
Modelwill check if the user is currently in the Student View usingModel#isInStudentView(). This ensures that there is a targetModuleandTutorialGroupfor theStudentto be listed from.Model#updateFilteredStudentList(Predicate<Student>)method then displays all the students within the targetModuleandTutorialGroup.
Section 5.6 - View Commands - viewTG and viewStudent
Overview
The View command in Trackr enables users to easily navigate between the different views: Module View, Tutorial Group View and Student View.
Implementation
Each View command for TutorialGroup, and Student is split into ViewTutorialGroupCommand, and ViewStudentCommand, respectively. Note that there
is no View command for Module. Each command class extends Command.
Given below is an example of the interaction between the Model and the ViewTutorialGroupCommand of Trackr.

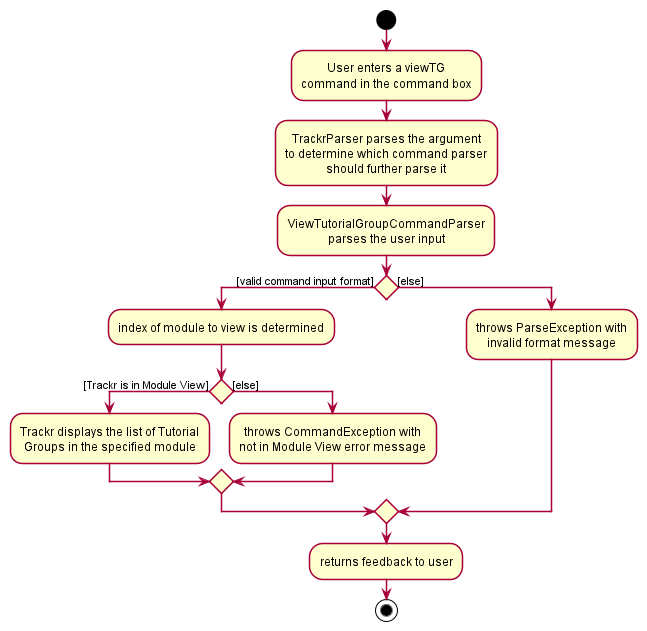
Step 1. The user executes viewTG 1 to view the tutorial groups of the first module within the Module View. The
viewTG command calls LogicManager#execute(String).
Step 2. The contents of the String is parsed in ViewTutorialGroupCommandParser#parse(String). This method creates a
new Index object with the parsed arguments. A ViewTutorialGroupCommand object is then initialised with this Index
object.
Step 3. LogicManager#execute(String) calls the ViewTutorialGroupCommand#execute(Model) method of the
ViewTutorialGroupCommand object.
Step 4. Within Model, the method Model#setViewToTutorialGroup(Module) is executed and this displays all the tutorial
groups of the target Module.
Step 5. ViewTutorialGroupCommand#execute(Model) creates a CommandResult object and the CommandResult is returned
to LogicManager.
Note: There are some differences for the view command of
Studentduring Step 4.For
Student:
- Within each
TutorialGroup, there is anUniqueStudentList.- The
Modelwill check if the user is currently in the Student View usingModel#isInStudentView(). This ensures that there is a targetModuleandTutorialGroupfor theStudentto be viewed from.Model#setViewToStudent(TutorialGroup)method then displays all the students of the targetModuleandTutorialGroup.
Section 5.7 - Clear Command - clear
Overview
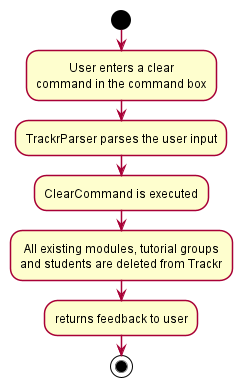
The Clear command in Trackr enables users to easily clears all data. Users will be able to erase all data in one simple command.
Implementation
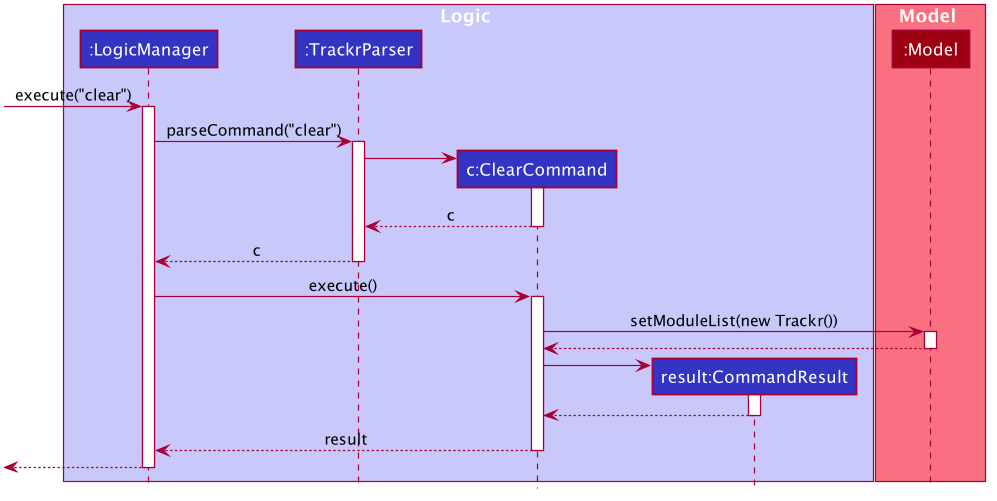
The Clear command is the same for Module, TutorialGroup, and Student, which falls under ClearCommand
The command class extends Command.
Given below is an example of the interaction between the Model and the ClearCommand of Trackr.
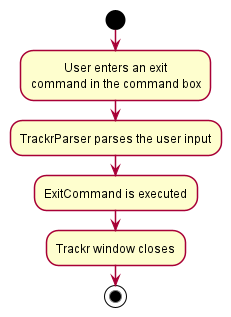
Section 5.8 - Exit Command - exit
Overview
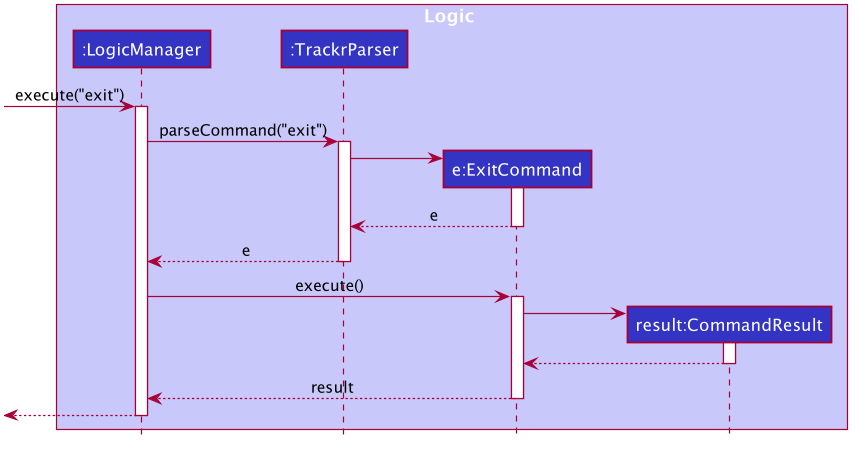
The Exit command in Trackr enables users to easily exit the app. Users will be able to close the application. Data will be saved automatically.
Implementation
The Exit command is the same for Module, TutorialGroup, and Student, which falls under ExitCommand
The command class extends Command.
Given below is an example of the interaction between the Model and the ExitCommand of Trackr.
Section 5.9 - Data saving and loading
Implementation
The data saving and loading mechanism is facilitated by JsonModuleStorage. It has the operations to save and read data written in Json format to represent modules and their attributes such as tutorial groups and students, stored internally in StorageManager as a moduleStorage. Additionally it implements the following operations:
-
JsonModuleStorage#getModuleFilePath()— Obtains the file path of which the Json file representing the data is to be saved to. -
JsonModuleStorage#readModuleList()— Reads the Json file found in the stores file path representing the module list and returns a ReadOnlyTrackr<Module> representing the modules saved in the Json file along with their attributes such as tutorial groups and students. -
JsonModuleStorage#saveModuleList(ReadOnlyTrackr<Module> moduleList)— Writes the Json file representing the module list based on theReadOnlyTrackr<Module>passed into the operation, saving the Json file representing the modules along with their attributes such as tutorial groups and students in the stored file path.
These operations are exposed in the ModuleStorage interface as ModelStorage#getModuleFilePath(), ModelStorage#readModuleList() and ModuleStorage#saveModuleList(ReadOnlyTrackr<Module> moduleList) respectively.
The data stored in JsonModuleStorage is designed in a nested manner, JsonModuleStorage contains JsonSerializableModuleList which is a class that is used by the Jackson class for conversion to and from the Json format. JsonSerializableModuleList stores a list of JsonAdaptedModule which stores a list of JsonAdaptedTutorialGroup which stores a list of JsonAdaptedStudent which also stores a list of JsonAdaptedTag. Due to the nature of this nesting all these attributes are stored in a single Json file which branches out to these attributes, stored in a file called modulelist.json.
Saving and loading is done by the external class JsonUtil, who’s static methods allow for the conversion of data in Json files. The methods used are:
-
JsonUtil#readJsonFile(Path filePath, Class<T> classOfObjectToDeserialize)— Reads the Json file found at the file path, and converts it into the object of class T by using anObjectMapper. -
JsonUtil#saveJsonFile(T jsonFile, Path filePath)— Converts the object of class T into a Json file at the file path using theFileUtil.
Given below is an example usage scenario and how the load mechanism behaves in every step.
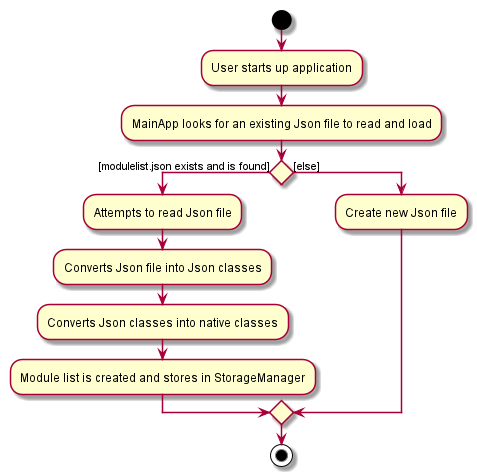
Step 1. The user launches the application. The MainApp will seek for a ModuleStorage and pass it to the StorageManager who will call readModuleList(Path filePath) to attempt to read module data from the Json file. If the file does not already exist, a new Json file is created.
Step 2. The JsonSerializableModuleList is broken down into individual JsonAdaptedModule objects that are also converted into Module objects. To fill these modules with their identity fields such as moduleId, the Json file is read and the values of the fields are used to construct the Module. For the data fields such as the list of TutorialGroup objects, the list of JsonAdaptedTutorialGroup is converted into their corresponding class TutorialGroup.
Step 3. The process is repeated in JsonAdaptedTutorialGroup to obtain the list of Student objects by converting JsonAdaptedStudent objects.
Step 4. Once all layers of the Json objects have been converted to their corresponding class, the module list is ready and is used by StorageManager, available to be used by ModelManager in future to display these objects in the UI.
The following activity diagram summarizes how data from the Json file is read and loaded when a user starts up the application:
Design consideration:
Aspect: How the Json file is structured.
-
Alternative 1 (current choice): Saves the entire module list in a single file, nesting all internal components.
- Pros: Easy to implement due to abstraction allowing conversion process to be done.
- Cons: Easier for file to get corrupted, and will lead to massive lost of data should data corruption occur.
-
Alternative 2: Saving lists of modules, tutorial groups, and students in separate Json files.
- Pros: Easier to test each list individually to check the Json structure of each object type, and data corruption will lead to only data in separate lists to be lost (e.g. A corrupted
TutorialGrouplist will lead to no loss in theModulelist) - Cons: Difficult to reconstruct the Json classes into the native classes and more data required to be stored for
StorageManagerto know which objects belong to which (e.g. WhichModuleaTutorialGroupbelongs to).
- Pros: Easier to test each list individually to check the Json structure of each object type, and data corruption will lead to only data in separate lists to be lost (e.g. A corrupted
Section 6 - Documentation, logging, testing, configuration, dev-ops
Appendix A - Product Scope
(written by: Tan Eu Zin)
Target user profile:
- Teaching Assistants(TAs) across NUS
- Teaches multiple modules
- Needs to manage multiple classes
- Needs to manage multiple students
- Prefers desktop apps over other types
- Prefers data to be consolidated in one place
- Prefers data to be saved locally
- Can type fast
- Prefers typing to mouse interactions
- Is reasonably comfortable using Command Line Interface (CLI) apps
Value proposition:
- Trackr allows teaching assistants to manage modules, tutorial groups, and students all in one place.
- Trackr stores and retrives information faster and more efficiently than a typical mouse/GUI driven app.
- Breeze through your admin work with Trackr, so you can focus on the work that really matters
Appendix B - User Stories
(written by: Tan Eu Zin)
Priorities: High (must have) - * * *, Medium (nice to have) - * *, Low (unlikely to have) - *
| Priority | As a … | I want to … | So that I can… |
|---|---|---|---|
* * * |
Teaching Assistant | add/delete a module | manage the list of modules I teach |
* * * |
Teaching Assistant | edit a module | keep the module information accurate if there are changes |
* * * |
Teaching Assistant | find a module | quickly get to the module I am looking for |
* * * |
Teaching Assistant | list all the modules I teach | have an overall view of all the modules |
* * * |
Teaching Assistant | add/delete a tutorial group | manage the list of tutorial groups I teach |
* * * |
Teaching Assistant | edit a tutorial group | keep the tutorial group information accurate if there are changes |
* * * |
Teaching Assistant | find a tutorial group | quickly get to the tutorial group I am looking for |
* * * |
Teaching Assistant | list all the tutorial groups I teach | have an overall view of all the tutorial groups |
* * * |
Teaching Assistant | add/delete students to my list | manage the list of students I teach |
* * * |
Teaching Assistant | edit a student | keep the student information accurate if there are changes |
* * * |
Teaching Assistant | find a student | quickly get to the student I am looking for |
* * * |
Teaching Assistant | add/delete attendance of a student | properly track the attendance of my students |
* * * |
Teaching Assistant | list all the students I teach | have an overall view of all the students |
* * * |
Teaching Assistant | edit attendance of a student | keep the attendance information accurate if there are changes |
* * * |
Teaching Assistant | filter attendance of my students | find students who have not been attending classes |
* * * |
Teaching Assistant | add participation scores of my students | credit my students for their participation |
* * * |
Teaching Assistant | edit participation scores of my students | keep the participation information accurate if there are changes |
* * * |
Teaching Assistant | filter participation scores of my students | check if any of my students are not participating |
* * * |
Teaching Assistant | save my data | continue where I left off in the previous session |
* * * |
Teaching Assistant | clear all my existing data | easily start on a clean slate for a new semester |
* * * |
Teaching Assistant | access a help guide | look up my problems if when I encounter any |
* * * |
Teaching Assistant | exit the app | exit the app immediately to close it |
* * |
Teaching Assistant | have a way to upload stored on an excel sheet | input information I already have stored elsewhere |
* * |
Teaching Assistant | have a way to export data onto an excel sheet | easily extract information from the app to submit |
{More to be added}
Appendix C - Use Cases
(For all use cases below, the System is Trackr and the Actor is the user, unless specified otherwise)
Use case: UC01 - View all tutorial groups within a module
Preconditions: User is in Module View
MSS
- User keys in command to view the tutorial groups of a specific module.
- Trackr displays the list of tutorial groups and shows a confirmation message.
Use case ends.
Extensions
- 1a. Trackr detects an error in the command parameter.
- 1a1. Trackr displays an error message and proper command format.
- 1a2. User enters a new parameter.
Steps 1a1-1a2 are repeated until the parameter entered are correct.
Use case resumes from step 2.
Use case: UC02 - View all students within a tutorial group of a module
Preconditions: User is in Tutorial Group View
MSS
- User requests to view all tutorial groups within a module (UC01).
- User keys in command to view the students of a specific tutorial group.
- Trackr displays the list of students and shows a confirmation message.
Use case ends.
Extensions
- 2a. Trackr detects an error in the command parameter.
- 2a1. Trackr displays an error message and proper command format.
- 2a2. User enters a new parameter.
Steps 2a1-2a2 are repeated until the parameter entered are correct.
Use case resumes from step 3.
Use case: UC03 - Add a student
Preconditions: User is in Student View
MSS
- User requests to view all students within a tutorial group of a module (UC02).
- User enters the student data.
- Trackr adds the student to the displayed list.
- Trackr shows a message with the added student’s details.
Use case ends.
Extensions
- 2a. Trackr detects that the data entered is in the wrong format.
- 2a1. Trackr displays an error message and proper command format.
- 2a2. User enters new data.
Steps 2a1-2a2 are repeated until the data entered are correct.
Use case resumes from step 3.
Use case: UC04 - Delete a student
Preconditions: User is in Student View
MSS
- User requests to view all students within a tutorial group of a module (UC02).
- User enters command to delete a specific student in the displayed list.
- Trackr deletes the student from the displayed list.
- Trackr shows a message with the deleted student’s details.
Use case ends.
Extensions
-
1a. The list is empty. Use case ends.
-
2a. Trackr detects an error in the command parameter.
- 2a1. Trackr displays an error message and proper command format.
- 2a2. User enters a new parameter.
Steps 2a1-2a2 are repeated until the parameter entered are correct.
Use case resumes from step 3.
Use case: UC05 - Loading a save file
MSS
- User launches the application.
- Trackr attempts to read the save file.
- Trackr successfully parses the save file and loads the lists of modules on it.
- User can start using the application.
Use case ends.
Extensions
- 3a. The save file is corrupted or in the wrong format.
- 3a1. Trackr shows an error message.
- 3a2. Trackr starts a new save file and overwrites the existing one.
Use case resumes from step 4.
- 3b. The save file does not exist.
- 3b1. Trackr creates a new save file.
Use case resumes from step 4.
Use case: UC06 - Search for a student
Preconditions: User is in Student View
MSS
- User requests to view all students within a tutorial group of a module (UC02).
- User enters the find command with keyword(s) to search for a specific student in the list.
- Trackr displays a list of student(s) with name(s) that match the keyword(s).
Use case ends.
Extensions
- 1a. The list is empty.
Use case ends.
Use case: UC07 - Edit a student’s details
Preconditions: User is in Student View
MSS
- User requests to view all students within a tutorial group of a module (UC02).
- User enters the edit command with new student details for a specific student in the list.
- Trackr edits the student in the displayed list.
- Trackr shows a message with the edited student’s details.
Use case ends.
Extensions
- 1a. The list is empty.
Use case ends.
- 2a. Trackr detects an error in the command.
- 2a1. Trackr displays an error message and proper command format.
- 2a2. User enters new command.
Steps 2a1-2a2 are repeated until the parameter entered are correct.
Use case resumes from step 3.
Appendix D - Non-Functional Requirements
- Should work on any mainstream OS as long as it has Java
11or above installed. - Should be able to hold up to 1000 module, tutorial group and student details without a noticeable sluggishness in performance for typical usage.
- A user with above average typing speed for regular English text (i.e. not code, not system admin commands) should be able to accomplish most of the tasks faster using commands than using the mouse.
- The data should be stored locally, so the user would not require the Internet to access his data.
Appendix E - Glossary
- Mainstream OS: Windows, Linux, Unix, OS-X
- JSON: A format in which data is stored in attribute-value pairs
- Private contact detail: A contact detail that is not meant to be shared with others
- TA: Teaching Assistant
- Modules: University courses that Teaching Assistants teach
- Tutorial Groups: Small groups of Students within each Module that Teaching Assistants are responsible for
- Students: Students who are enrolled in a specific Module and a specific Tutorial Group under a specific Teaching Assistant
Appendix F - Instructions for manual testing
Given below are instructions to test the app manually.
Launch and shutdown
-
Initial launch
-
Download the jar file and copy into an empty folder
-
Double-click the jar file or run
java -jar Trackr.jarin Terminal.
Expected: Shows the GUI with a sample Module CS2103T. The window size may not be optimum. -
Resize the window to an optimum size. Move the window to a different location. Close the window.
-
Window preferences should be automatically saved.
-
Close the app by clicking the close button located at the top left corner or run
exitin Trackr. -
Re-launch the jar file.
Expected: The most recent window size and location is retained. -
{ more test cases … }
Adding a Module
-
Adding a module while all modules are being shown.
-
Prerequisites: Navigate to the Module view using
prevVieworlistMod. List all modules using thelistModcommand. -
Test case:
addMod m/CS3243
Expected: New module with code CS3243 will be added to the bottom of the list. Details of the added Module is shown in the status message. -
Test case:
addMod m/CS3243(Attempting to add Module with the same code)
Expected: No new module is added. An error message indicating the existence of duplicates is shown in the status message. -
Test case:
addMod(No parameters)
Expected: Invalid command format error message is shown in the status message, along with an example command that works. -
Test case:
addMod m/CS@oraddMod m/(Non-alphanumeric characters or blank module code)
Expected: An error message indicating that module code can only be alphanumeric characters and should not be blank is shown in the status message. -
{ more test cases … }
Deleting a Module
-
Deleting a module while all modules are being shown.
-
Prerequisites: Navigate to the Module view using
prevVieworlistMod. List all modules using thelistModcommand. -
Test case:
deleteMod 1
Expected: First module is deleted from the list. Details of the deleted module shown in the status message. -
Test case:
deleteMod 0ordeleteMod(Index 0 or no index specified)
Expected: No module is deleted. Error details shown in the status message. -
Test case:
deleteMod [insert an index that does not exist](Index does not exist)
Expected: No module is deleted. An error message indicating that the index is invalid is shown in the status message. -
Test case:
deleteMod aordeleteMod 1.5(Non-integer index) Expected: No module is deleted. Error details shown in the status message. -
{ more test cases … }
Editing a Tutorial Group
-
Editing a tutorial group while all tutorial groups are being shown.
-
Prerequisites: Navigate to the Tutorial Group view using
prevVieworviewTG MODULE_INDEX. List all tutorial groups using thelistTGcommand. Add a tutorial group using the commandaddTG tg/T03 day/MON start/11:00 end/13:00. -
Test case:
editTG 1 tg/T18
Expected: The tutorial group code of the first tutorial group is modified to be T18. Details of the edited tutorial group shown in the status message. -
Test case:
editTG 1(No specified field to be edited)
Expected: No tutorial group is modified. Error details shown in the status message. -
{ more test cases … }
Finding a Tutorial Group
-
Finding a tutorial group while all tutorial groups are being shown.
-
Prerequisites: Navigate to the Tutorial Group view using
prevVieworviewTG MODULE_INDEX. List all tutorial groups using thelistTGcommand. Add two tutorial groups using the commandsaddTG tg/T03 day/MON start/11:00 end/13:00andaddTG tg/B03 day/MON start/11:00 end/13:00. -
Test case:
findTG b
Expected: The list is filtered to only show the tutorial group whose code contains the letter b. The number of matching tutorial groups is shown in the status message. -
Test case:
findTG(No specified keyword)
Expected: The list is not filtered. Error details shown in the status message. -
{ more test cases … }
Listing all Tutorial Groups
-
Listing all tutorial groups while not all tutorial groups are being shown.
-
Prerequisites: Navigate to the Tutorial Group view using
prevVieworviewTG MODULE_INDEX. List all tutorial groups using thelistTGcommand. Filter the list shown using thefindTG bcommand. This should make the list to only show the tutorial groups whose code match the letter b. -
Test case:
listTG
Expected: The list is restored to show all tutorial groups. A message indicating that all tutorial groups are shown is shown in the status message. -
{ more test cases … }
Viewing the Students of a Tutorial Group
-
Viewing all students of a tutorial group.
-
Prerequisites: Navigate to the Tutorial Group view using
prevVieworviewTG MODULE_INDEX. List all tutorial groups using thelistTGcommand. Add a tutorial group using the commandaddTG tg/T03 day/MON start/11:00 end/13:00. -
Test case:
viewStudent 1
Expected: The view is changed from Tutorial Group view to Student view. The list shown is restored to show all students of the first tutorial group. A message indicating that all students are shown is shown in the status message. -
{ more test cases … }
Clearing Trackr
-
Clearing all data in Trackr.
-
Prerequisites: List all modules using the
listModcommand. -
Test case:
clear
Expected: The view is changed to Module view. The list shown is cleared. A message indicating that Trackr has been cleared is shown in the status message. -
{ more test cases … }
Exiting Trackr
-
Exiting Trackr and saving all data.
-
Prerequisites: List all modules using the
listModcommand. -
Test case:
exit
Expected: Trackr will close by itself. The list shown is cleared. All data is saved automatically. When Trackr is re-launched, the same data will load. -
{ more test cases … }
Saving data
-
Dealing with missing/corrupted data files
- Simulating a corrupted file.
- Go to tp -> data -> modulelist.json.
- Change “moduleId” in line 3 to be “moduleeeeId”
- Close Trackr
- Re-launch Trackr Expected: Trackr will start fresh. All data will be deleted when a command is executed.
-
Suggestion: When data is missing unexpectedly, go over to modulelist.json and copy paste the file to another document. Check if each of the field is named correctly.
- { more test cases … }